Create an easy Merry Christmas modern sign using the Cricut Explore or Cricut Maker. This simple project will make a statement in your home this holiday season.
Welcome to Have Yourself A Very Cricut Christmas: 25 Days of Homemade Holiday Crafts!
Each day in December, I’ll be sharing a new Christmas project that you can make using your Cricut. It’s going to be a blog version of an advent calendar! Come back every day to get a new “gift.”
Today’s gift is a Merry Christmas Modern Sign


I love using signs when decorating my home. I think I’m getting obsessed with them because I happen to have a lot in storage right now.
They look so great and can really add a lot of depth to your decorations.
You can buy custom signs online from places like Etsy. But if you have a Cricut, you can actually make them yourself! Which also means you can make just about any design you can think of.
You’re going to love this Merry Christmas Modern Sign. Here’s how to make it!
How to Make a Merry Christmas Modern Sign Using The Cricut
This post contains affiliate links for your convenience. For more information, see my disclosures here.
Materials:
- Merry Christmas Modern Sign SVG file
- White Vinyl
- Wooden Sign Base (the one I used was 27” x 14.25”, but isn’t unfortunately no longer available from Michael’s)
Tools:
- Cricut Machine (You can use a Cricut Explore or a Cricut Maker for this project)
- Extended Standard Grip Cutting Mat
- Cricut Fine-Point Blade (comes with all Cricut Machines)
- Cricut Weeder Tool
- Cricut Brayer Tool
- Transfer Tape
- Tape Measure
- Pencil
How to Cut Out The Project Using The Cricut
First, you will need to download the Merry Christmas Modern Sign SVG file.
Get the Free Merry Christmas Modern Sign SVG File

Start by opening Cricut Design Space and creating a new project.
Upload the SVG File
Then, upload the SVG file by selecting the Upload button and then Upload Image. Next, drag and drop or select the SVG file you want to upload.
After the SVG is uploaded, add the image to your design canvas.
If you need a little more help uploading SVG files, you can learn more in this post.
The SVG file is already sized to fit a 27” x 14.25” wooden sign. If you have a different sized wooden sign, you will need to resize the svg image.

You can do this in Cricut Design Space by changing either the width or the height of the image. The other dimension will change proportionally.

Make It
Now it’s time to make your project!
Click on the Make It button in the upper right of the screen.
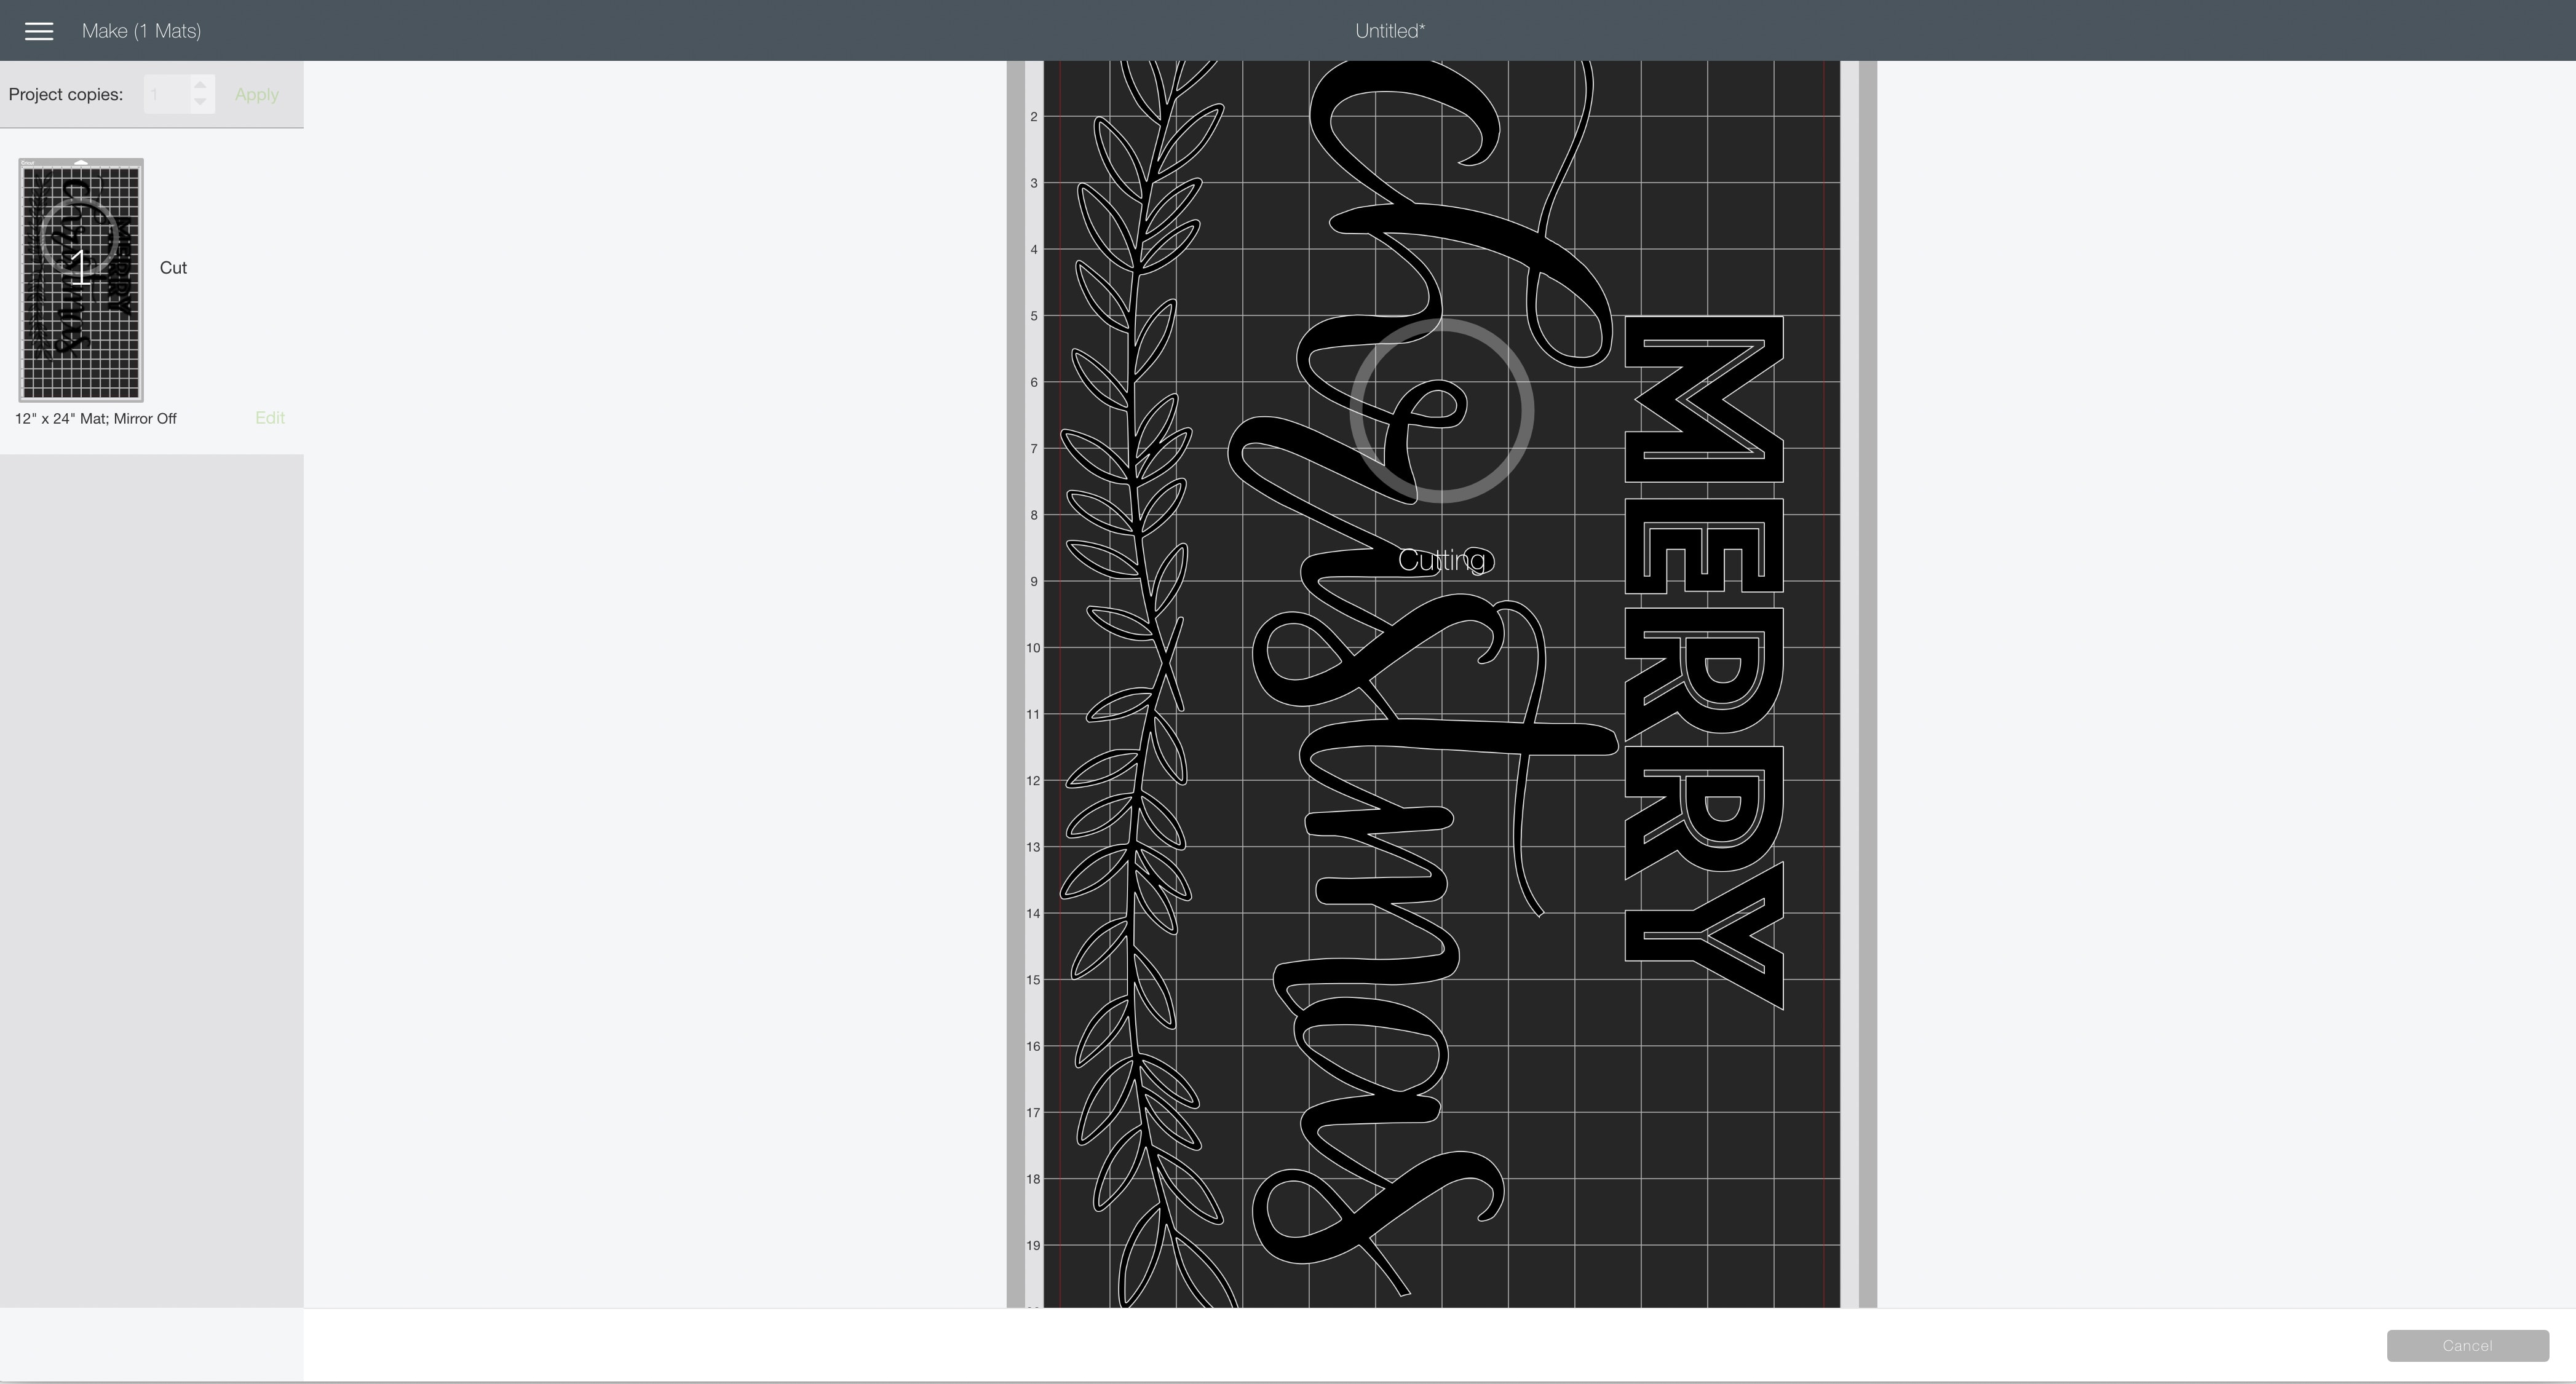
The first screen you will see is the Mat Preview Screen. This will show you all of the different mats needed for your project. Each mat represents another piece of material.
For this project, there is only one material. Because of the size of the image, you will need to use the extended standard grip cutting mat.

Click on the Continue button in the lower right of the screen.
Connect your Cricut machine. Then, adjust the settings as follows.
Material: Vinyl
Pressure: Default
Tools: Fine-Point Blade
Load the extended standard grip cutting mat with the white vinyl material into the machine. Then, press the flashing Go button to begin the cutting process.
How to Assemble The Project
Once all of your pieces are cut out, it’s time to assemble the project.

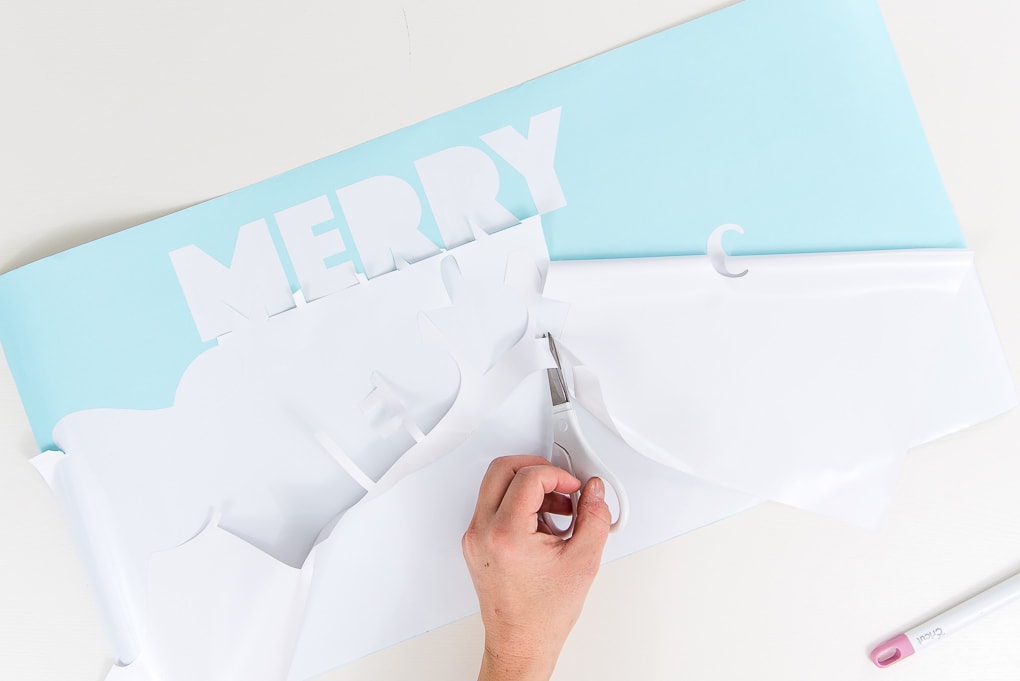
First, you will need to weed the vinyl design to remove the extra material. The goal is to leave only the vinyl for the design image behind.
Use the weeder tool to pick up the vinyl off the backing and easily remove it. After all of the extra vinyl is removed, you should be left with just the design on the vinyl backing.


Next, take a piece of transfer tape and place it over the entire design. I like to use these big rolls of transfer tape and cut it to the size of my design.

Smooth down the transfer tape with your hand or using the brayer tool.

Then, flip over the design and peel the blue vinyl backing away from the design. If the transfer tape is stuck properly, the vinyl will be attached to the transfer tape and will peel off of the vinyl backing.
But, if you are having problems with it sticking properly, flip the design over again and try to put more pressure on the transfer tape to get the vinyl to stick.


Next, measure your sign and mark the center. This will help you line up your vinyl design. I basically eyeballed the alignment and placed the transfer tape with the vinyl design onto the sign.

Use the brayer tool to transfer the vinyl from the transfer tape onto the sign. Make sure to get all of the vinyl pieces pressed down so it will stick properly.

Then, take one corner of the transfer tape and peel it back and away from your design. If the vinyl is stuck properly, the transfer tape will peel right off leaving the design behind.

Now, I left this part in my pictures because I want you to see that it’s ok to make mistakes with these projects. There’s normally a way to fix it.

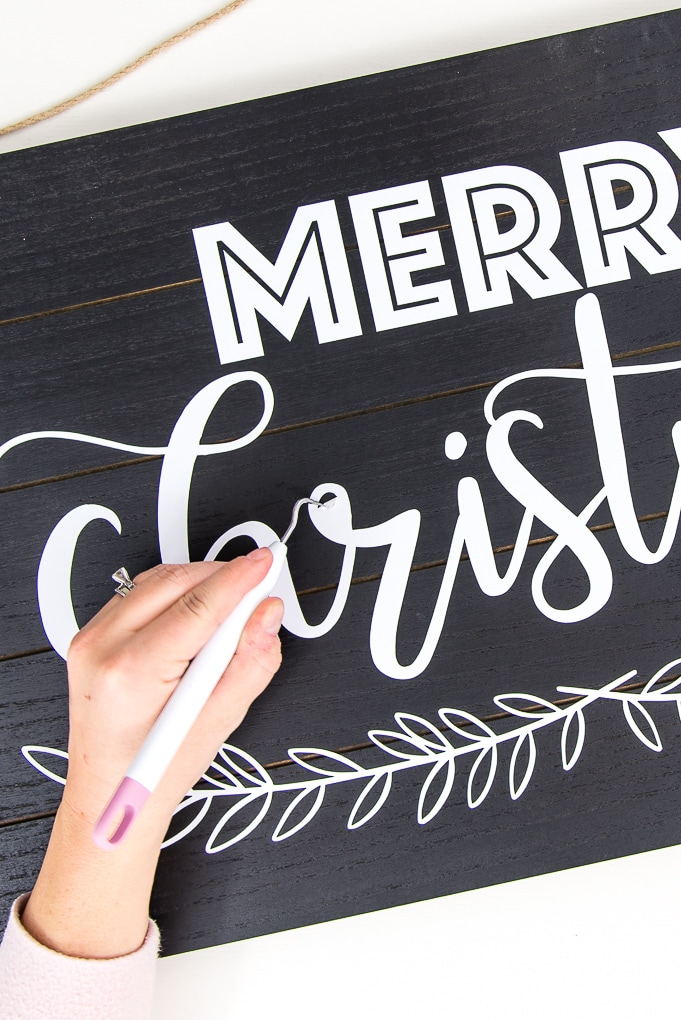
If you don’t get all of the extra vinyl pieces weeded properly before you transfer the design, you can always remove them from the finished sign. In this case, I missed the small piece of vinyl inside of the letter “r.”
All I did was grab the weeder tool again and use it to lift the small piece of vinyl off of the sign and remove it completely.
Now your Merry Christmas Modern Sign is ready!

I love how this sign turned out! It reminds me so much of the beautiful signs I see on Instagram and Etsy that people are selling. But the best part is, I made this one myself and it was basically free! (I had the supplies already)

I already know exactly where this is going to go in my home for Christmas this year.

I hope you love this Merry Christmas Modern Sign.
If you decide to make this project, I would love to see!
Tag me on Instagram. Use the hashtag #25daysofcricut so that we can all see each other’s projects too!
To see more projects from Have Yourself A Very Cricut Christmas: 25 Days of Homemade Holiday Crafts!, click here!
If you want to follow along and see all of the projects for Have Yourself A Very Cricut Christmas: 25 Days of Homemade Holiday Crafts!, you can bookmark this blog post and visit it each day to see the newest project.


2 Comments