How to Make Easy Plywood Wrapped Floating Shelves For Your Home
Floating shelves are a great design solution for any home because of their simple and functional design. They allow you to add storage to small spaces, where floor space might be lacking, while still looking beautiful.
Floating shelves get their name because they look like they’re floating on the wall. Unlike traditional wall shelves that use visible brackets, the supports for floating shelves are hidden inside of the shelves.
This gives floating shelves a more modern, streamlined look. And because of their simple design, they can fit in with almost every decor style.
You can find a reason to add a floating shelf to just about any room of your home.
Ben’s office was lacking in storage space. He had an existing small bookshelf in the room that he was using for storing his books and displaying meaningful items.
But his bookshelf was starting to get pretty full, and just wasn’t working in the space anymore.
I’ve always loved the look of floating shelves and knew that I wanted to include them somewhere in our home.
When Ben said he wanted some more storage in his office, I knew floating shelves would be the perfect solution!
If you want floating shelves in your home, you can buy pre-built versions from different home improvement stores like Home Depot or even big box stores.
However, if you want to cover an entire wall with shelves, buying pre-build ones can get really expensive.
The best, and most budget friendly way to get whole wall of floating shelves is to build them yourself.
We added floating shelves to our home in Ben’s office for under $150 total! It was an easy DIY project that made a huge impact in the room.
This post contains affiliate links for your convenience. For more information, see my disclosures here.
Materials & Tools for Building Floating Shelves
Materials for Floating Shelves
- 8’ 2×4 wood studs
- 1/8” thick 4’x8’ birch finishing plywood sheets
- wood glue
- 2.5” Kreg pocket hole screws (wood screws)
- 3” drywall screws
- 2.5” drywall screws
- Minwax grey tinted stain
- Minwax satin finish polyurethane
Tools for Floating Shelves
- Miter Saw or Circular Saw
- Drill and Drill Bit
- Brad Nailer or Nail Gun
- Kreg K4 Jig
- Razor saw
- Measuring tape or tape measure
- Stud Finder
- Combination square
- Level
- Block plane
- #0000 Steel Wool
- 220 Grit Sandpaper
- Foam brushes
- Pencil
How to Make Floating Shelves
Floating Shelves Design Plan
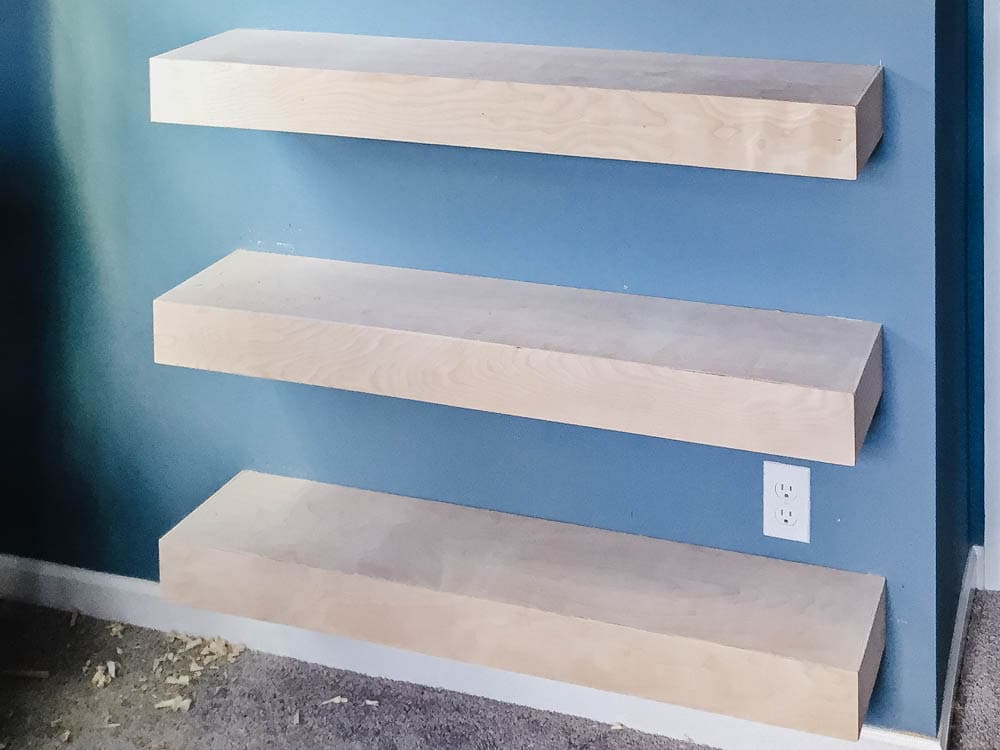
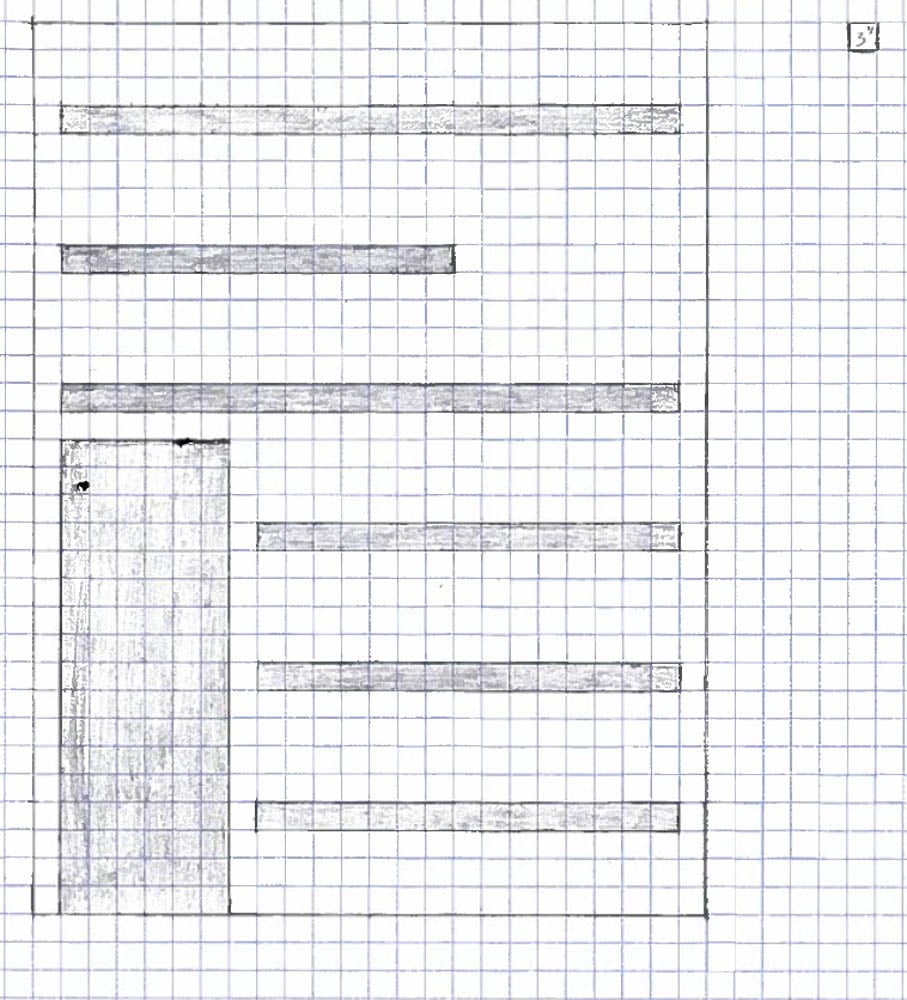
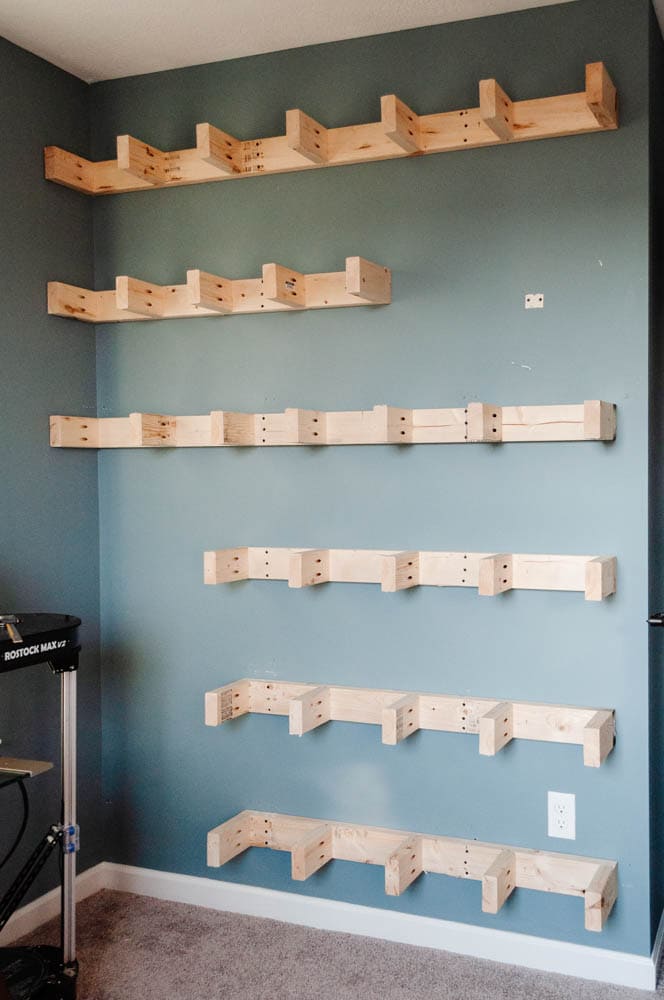
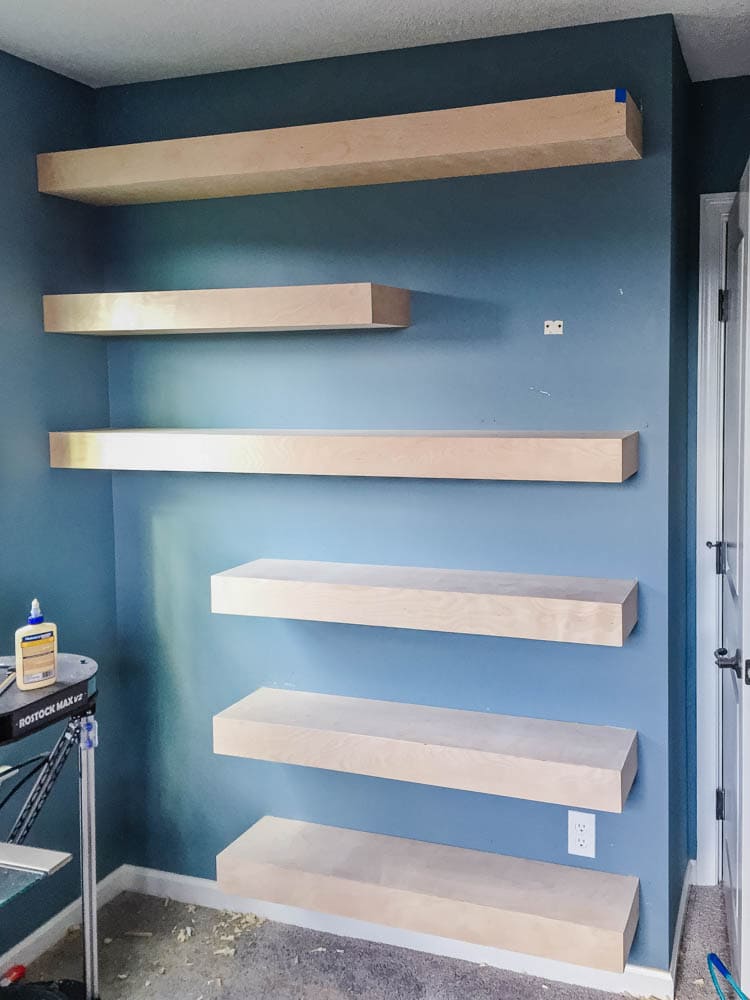
Before starting our DIY project, we created a design plan for the space. In order to maximize the storage space, we decided to build a full wall of floating bookshelves.
Ben sketched an initial design plan on graph paper to get a general layout for the wall shelves.

Graph paper is so helpful when creating a project design plan because you can draw your ideas to scale. Each of the squares in our design plan was 3″.
Using this reference point, we could see how large each of the shelves would be on the back wall.
How to Determine the Number of Floating Shelves
To figure out how many shelves will fit on a wall, you need to measure the entire wall and divide the space accounting for the thickness of the shelves you plan to build.
We planned for our shelves to be 3″ thick. The overall wall measured 8′ x 6′.
Using these measurements, we decided there would be 6 shelves, each 12″ apart. There would also be 9″ below the bottom shelf and above the top shelf.
We decided that our shelves would be 9″ deep. This would give us enough room for books, collectibles, and other decor without taking up too much space in the room.
Designing Floating Shelves
Ben wanted to leave space for his 3D printed in the bottom left section of the wall, so we shortened the overall length of the bottom 3 shelves.
To keep everything looking balanced, we also shortened the 5th shelf and created a 2’ space on the right side. We decided that this would be a good place to put taller decorations and add some visual interest to the wall.
Cutting Wood for Floating Shelves
Using your design plan, you can determine how large each floating shelf will be. Then you can create a cut list for your shelves.
A cut list is just a list you create of all the sizes of pieces you need for your project. For the shelves, you will want to list all of the shelf lengths that you need.
Once you have the measurements on your cut list, you can use a miter saw to cut the wood studs to the correct sizes.
Cut a quantity of 2 of each shelf length from the 2×4 wood studs. One of these pieces will be the back board for the shelf and the other will be the front board.
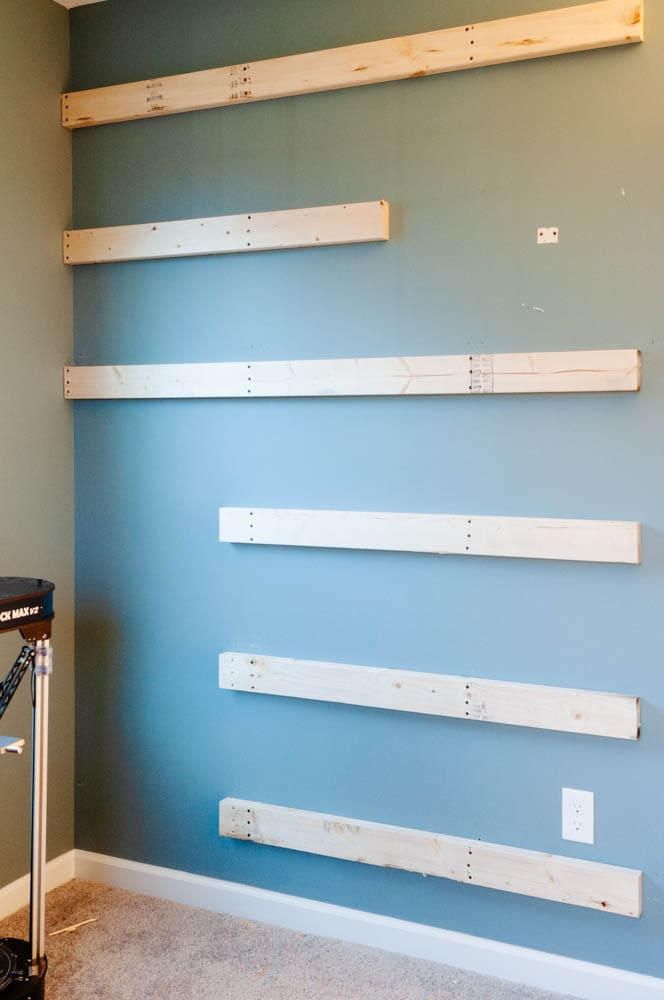
Preparing the Wall for Floating Book Shelves
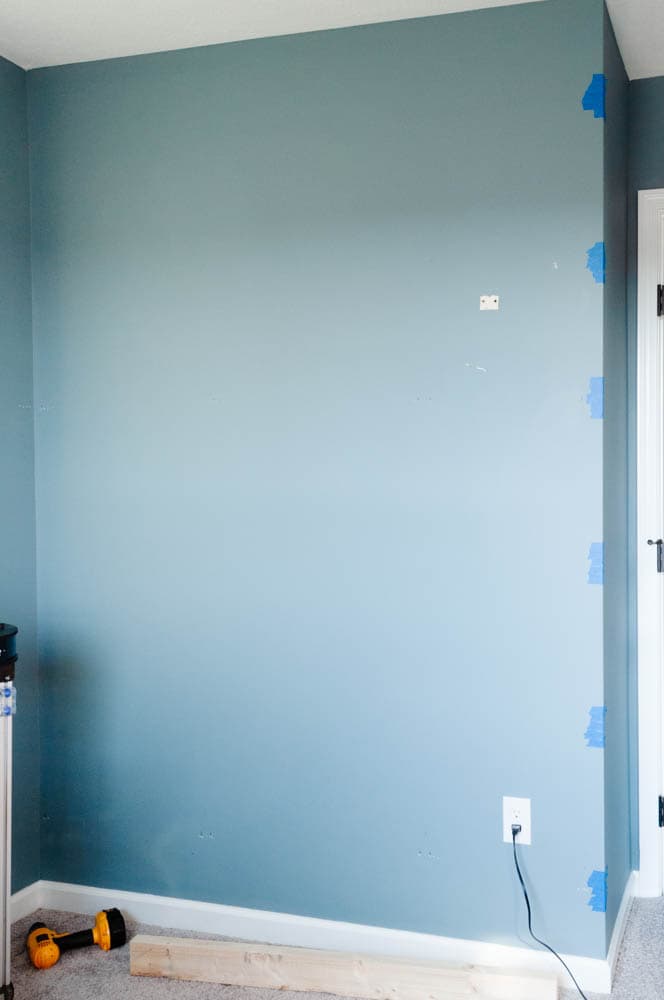
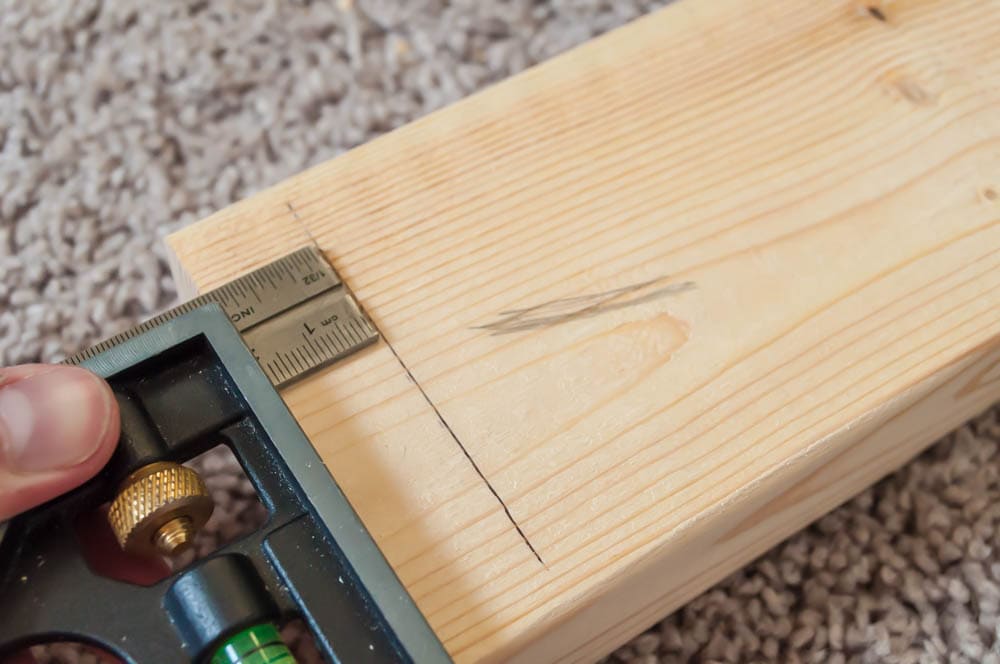
After we had a finalized layout for the shelves, we used a measuring tape and a pencil to mark the location of the top and sides of each shelf location on the wall.
Can You Hang a Shelf Without a Stud?
Next, we used a stud finder to locate the wall studs and mark the location of each one.
I recommend hanging floating shelves from wall studs for the most secure installation.
Some websites like Wikihow claim that you can install floating shelves without studs, however I never recommend this. Especially when your shelves are spanning a whole wall like this without side supports or shelf brackets.
Without installing directly into studs, you run the risk of your shelves sagging over time. And if you plan on using your shelves to hold heavier items like books, they might not be able to support that much weight.
I recommend that each of your floating shelves should span at least 2 studs.
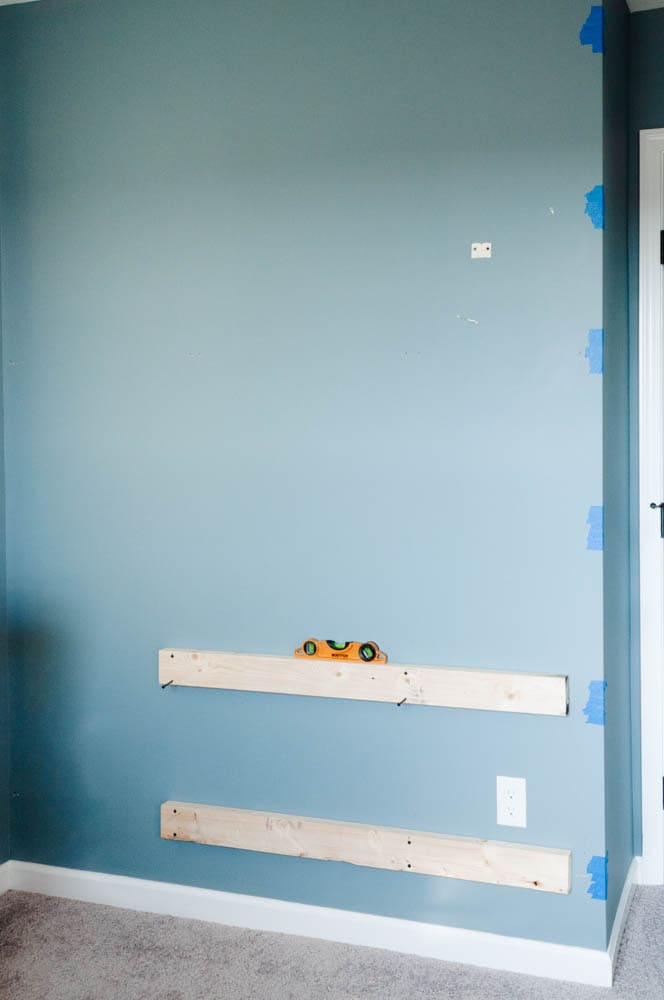
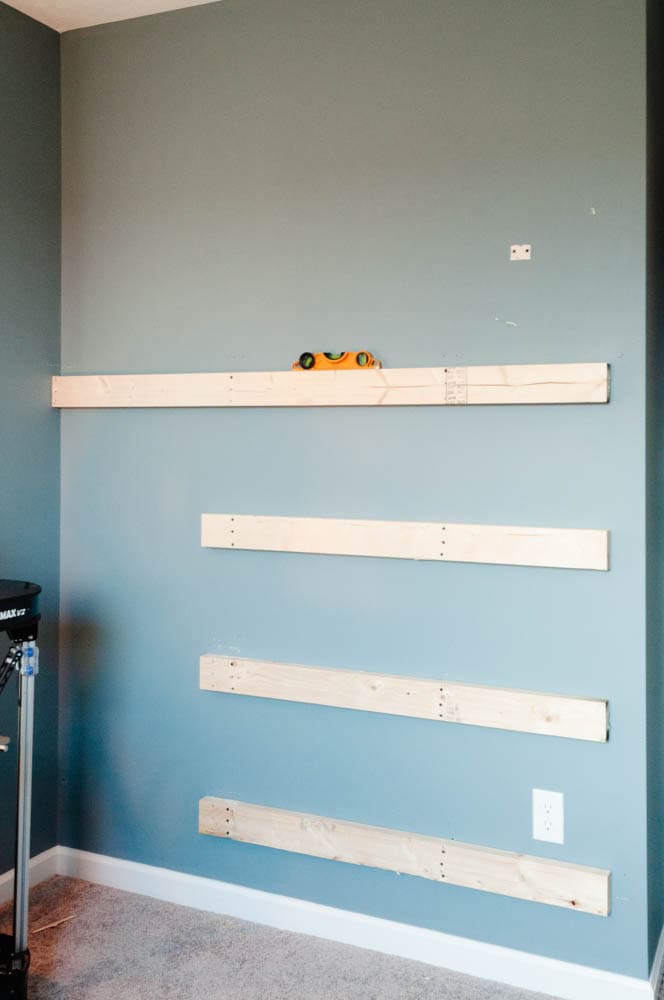
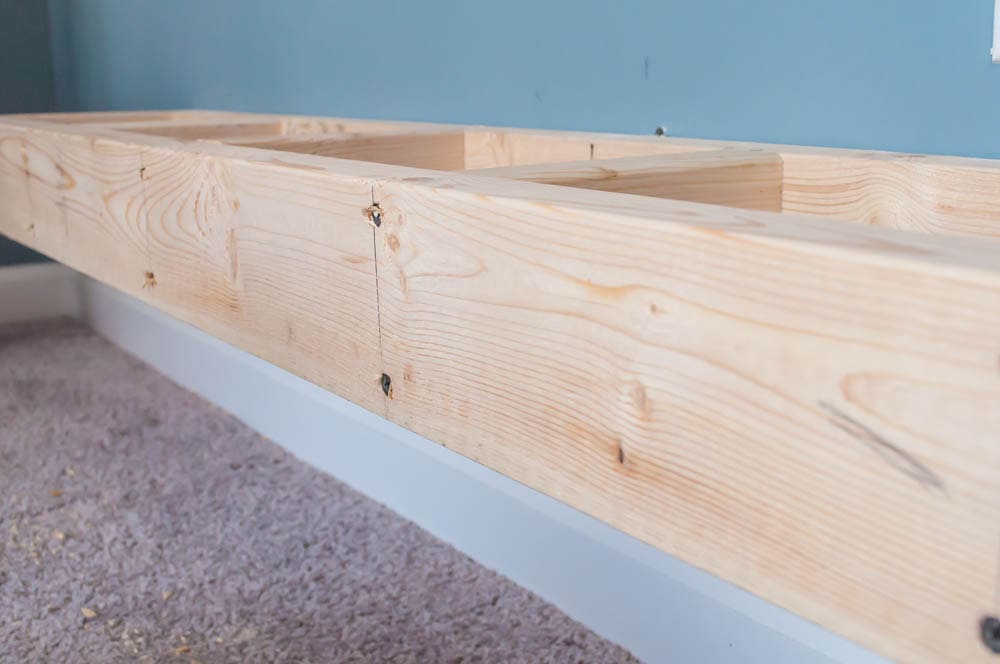
Installing the Back Board for Floating Shelves
With the wall prepared and marked for the shelf locations, the next step is to start installing the back boards.
The back boards are pieces of the 2×4 wood studs or pine boards that you cut previously to the length of each shelf.
Start at the bottom and hold each shelf back board piece up to the pencil marks on your wall. Make sure they line up with your shelf locations according to your plan.
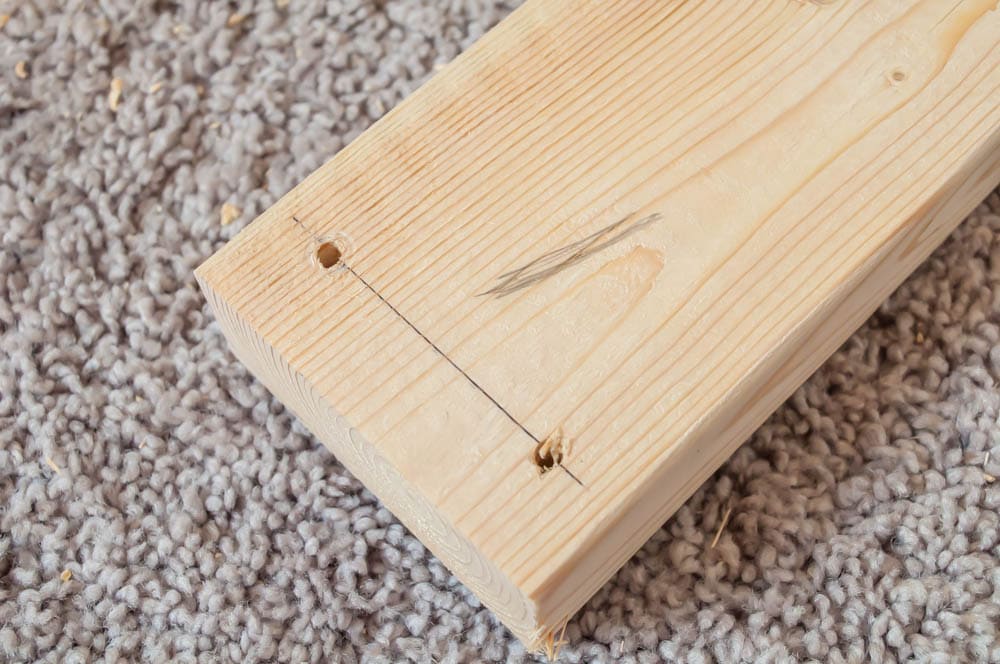
Using the marks you made for the studs as a guide, mark each stud location directly on the wood back board piece.
Then, take the back board piece and drill pilot nail holes into the wood where you marked the stud locations. Pilot holes are just smaller holes drilled through the material to act as a guide for installation later.
Next, use 3″ drywall screws to attach the back board shelf pieces to the wall. Make sure to use a level when lining up your back board piece, and double check that the shelf location matches your pencil marks on the wall.
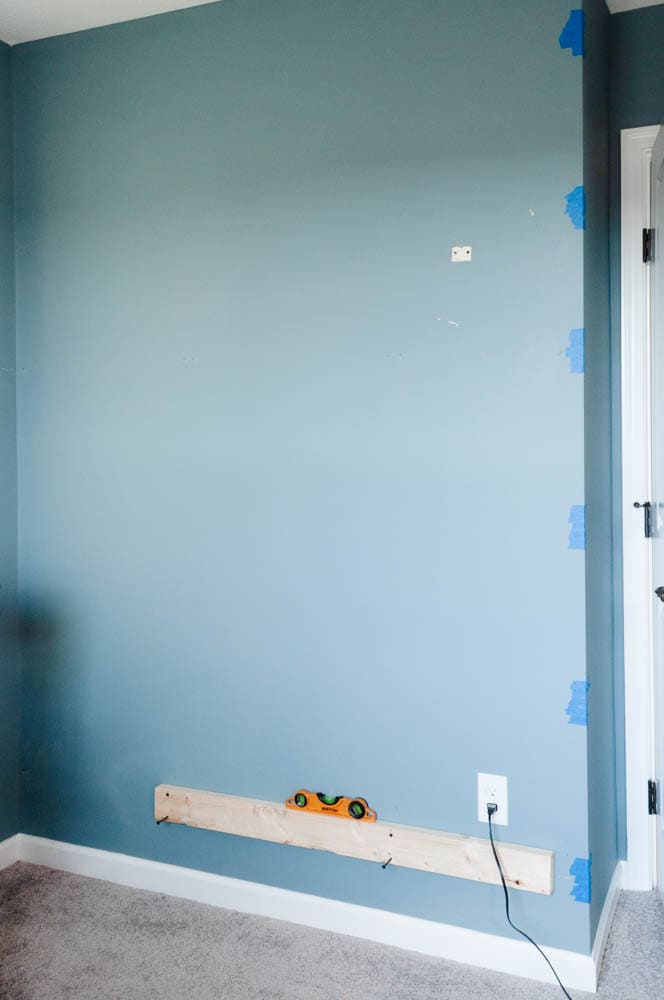
Repeat this process until all of your back board pieces are installed on the wall.
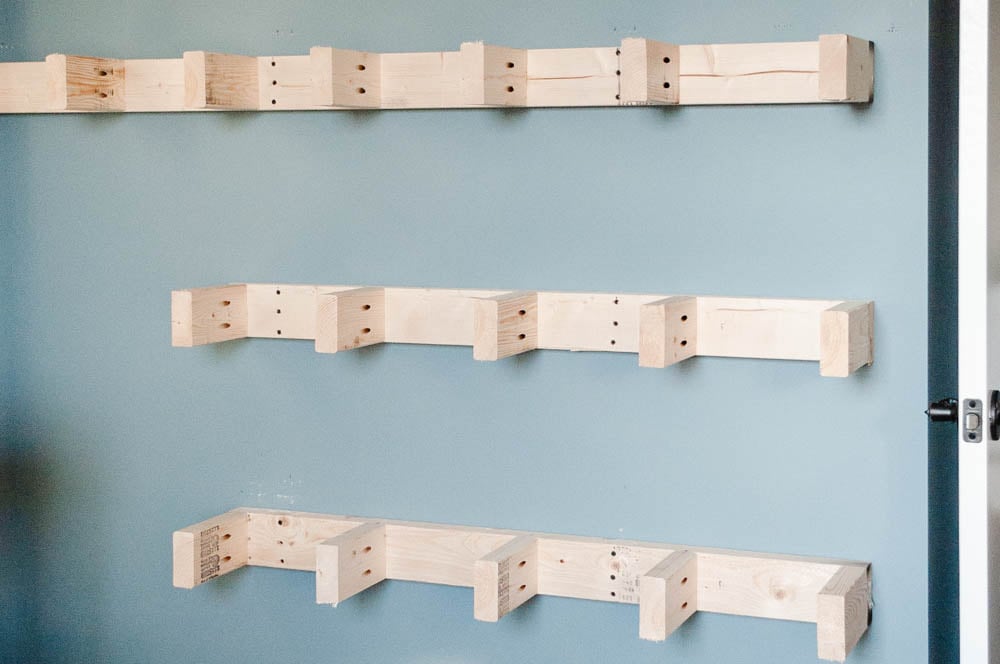
Floating Shelves Support Pieces
Once all of the back boards are in place, it’s time to start installing the support pieces for each floating shelf.
These blind shelf supports are necessary to get the floating shelf look without needing visible brackets.
We decided that having a support piece located every 8” was enough to support our shelves.
How Many Shelf Supports Will You Need?
To determine the number of support pieces needed for your floating shelves, first measure the length of each shelf. Then, divide the shelf length by 8 to get the number of support pieces needed for that shelf.
To determine the depth of your support pieces, you need to do a little bit of math.
Since the back of the shelf board is 1.5″ thick, and the front board will also be 1.5″ thick, you need to cut your support pieces to be 3″ less than your overall shelf depth.
Because we had decided earlier that the shelves would be 9” deep, we needed to cut our support pieces to 6” in length. This is taking into account the 3″ for the thickness of the back board and front board.
Cutting Wood for Floating Shelf Supports
Once you have the measurements for your support pieces, and the quantity needed for all of your shelves, you can start cutting.
Using a miter saw, cut each shelf support pieces from the 2×4 wood studs.
For our shelves, we cut 34 support pieces.
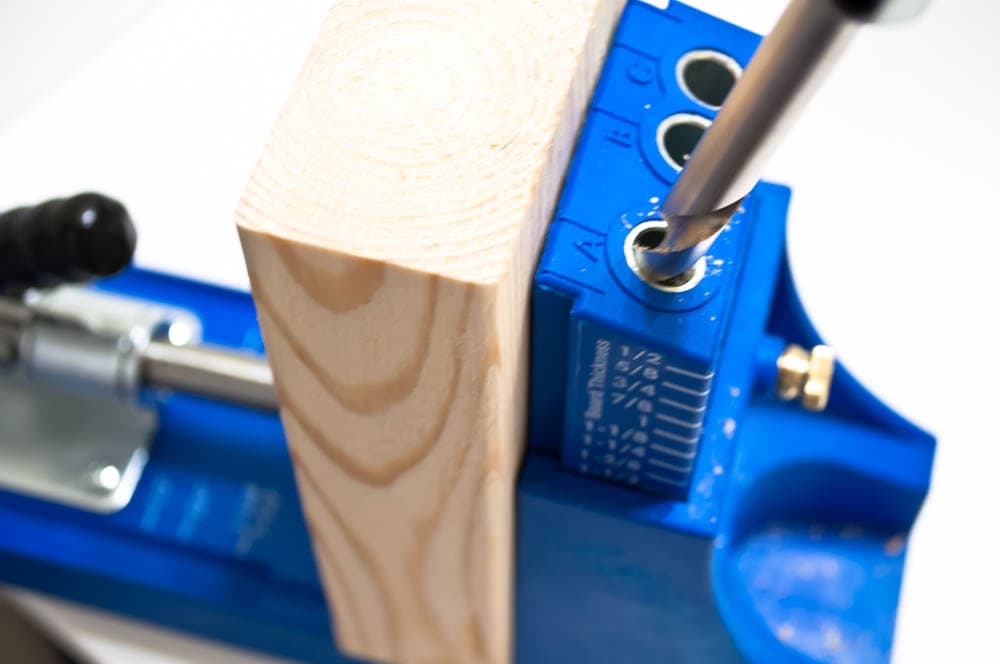
Pocket Holes Using a Kreg Jig
To attach the support pieces to the back boards of your shelves, I recommend using pocket holes. Pocket holes allow you to join two pieces of wood together in a clean, and strong method.
Pocket holes are ideal for floating shelves because they create a strong joint between the two wood pieces, adding durability to your wall shelves.
You can easily drill pocket holes using a Kreg Jig. This tool will guide you for the placement of the pocket hole and help you drill it correctly.
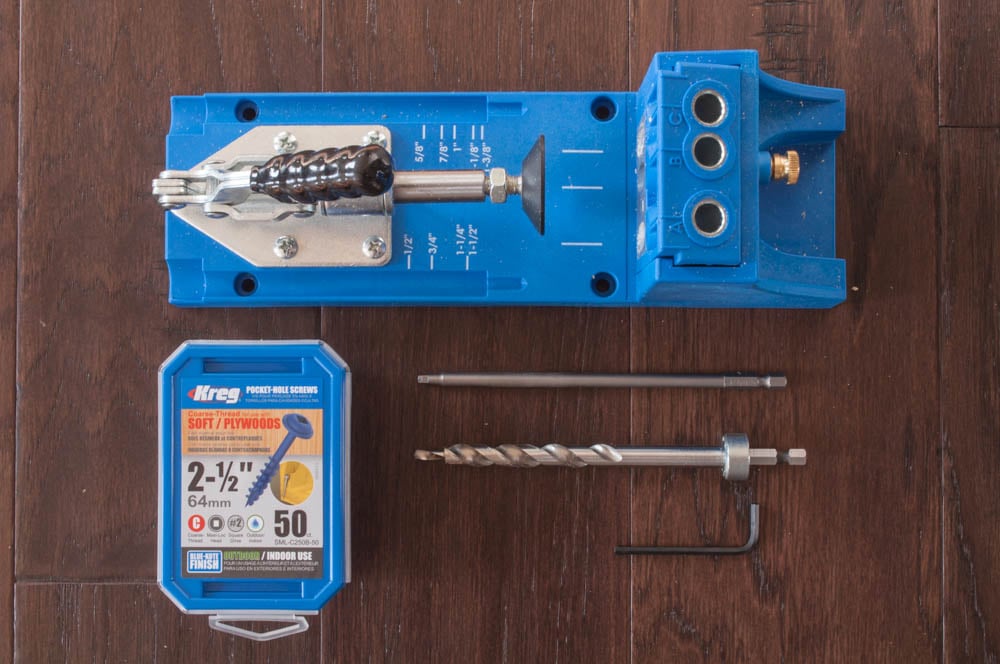
If you aren’t familiar with this tool, you can read all about how to use a Kreg Jig here.
The Kreg Jig seems like a complicated tool, but it comes with really easy instructions and only took us 5 minutes to setup.
The best part about it is how quick and easy it makes drilling pocket holes. We were able to drill pocket holes in all 34 support pieces in 20 min!
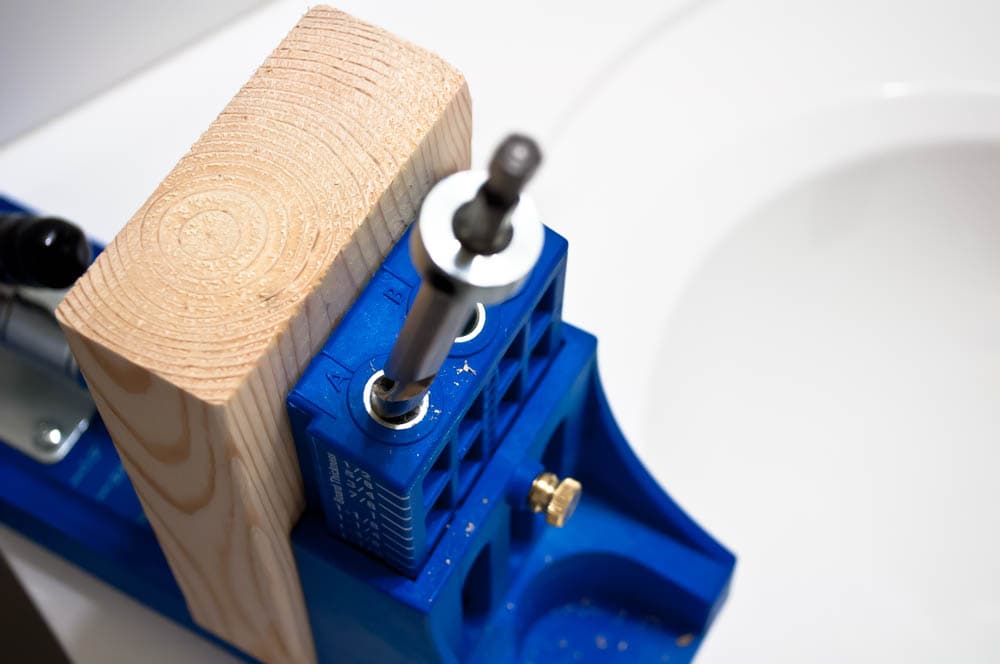
Follow the instructions for the Kreg Jig and set it to a 1.5″ wood thickness. Then drill your pocket holes in each of the shelf support pieces.
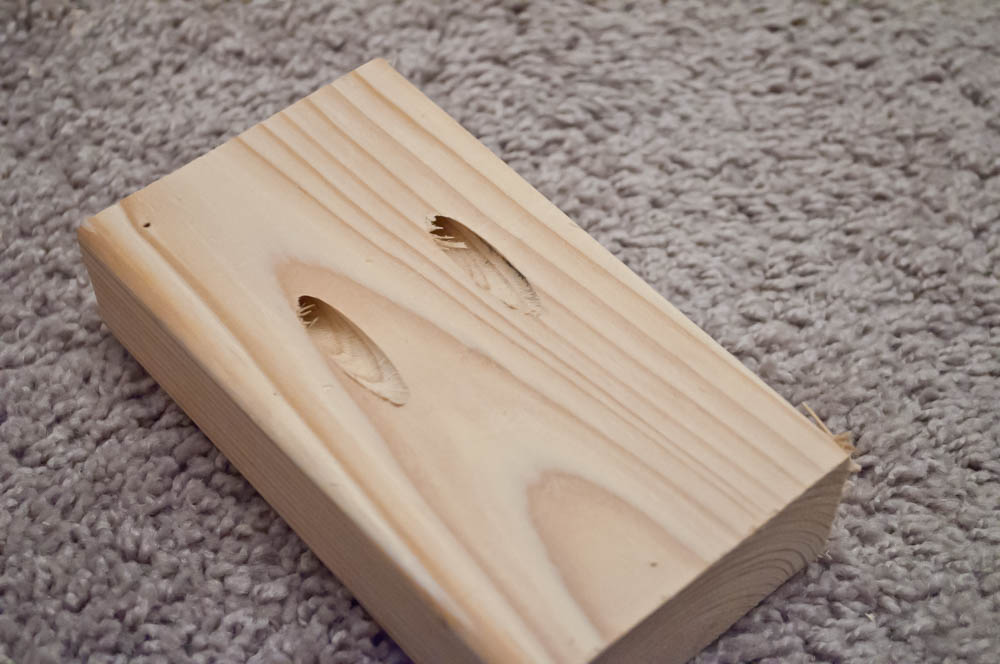
After drilling your pocket holes, each support piece should look like the piece in the picture below.
Installing Shelf Supports for Floating Shelves
To attach the shelf supports to the back board pieces you will need to use the Kreg pocket screws.
Line up each shelf support piece with the back board on the wall. Then use a drill to drive the pocket screws through the support piece and into the back board.
Install your shelf support pieces every 8″ along the back board piece that’s attached to the wall.
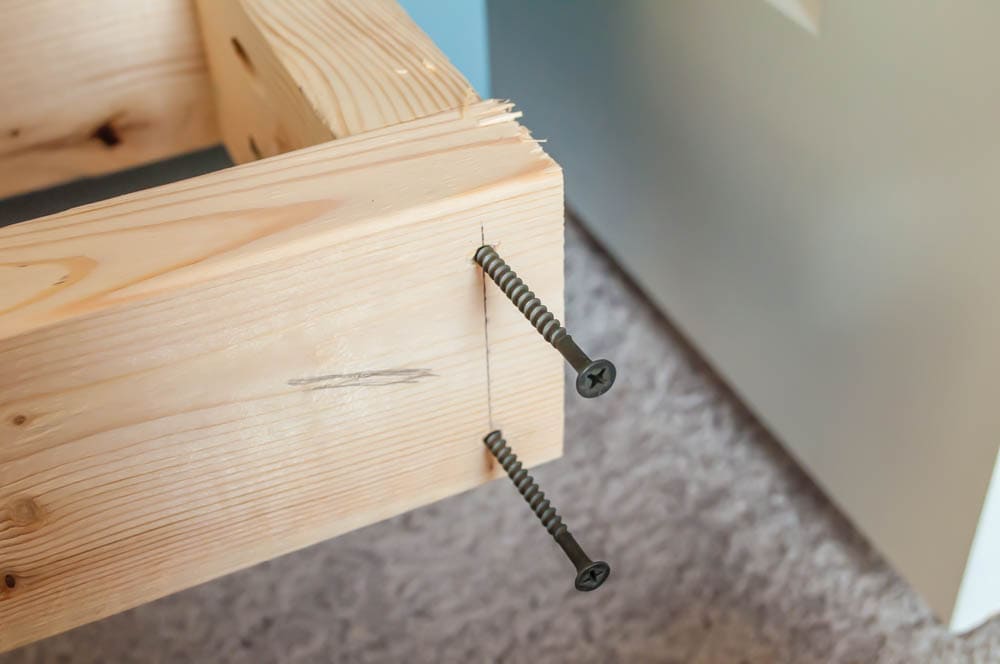
Installing the Front Board for Floating Shelves
The final step to complete your floating shelf frame is to install the front boards.
The front boards were cut earlier and are the same length as each back board.
To install the front boards, you will need 2.5″ drywall screws. You will use 2 screws for each support piece along the length of the shelf.
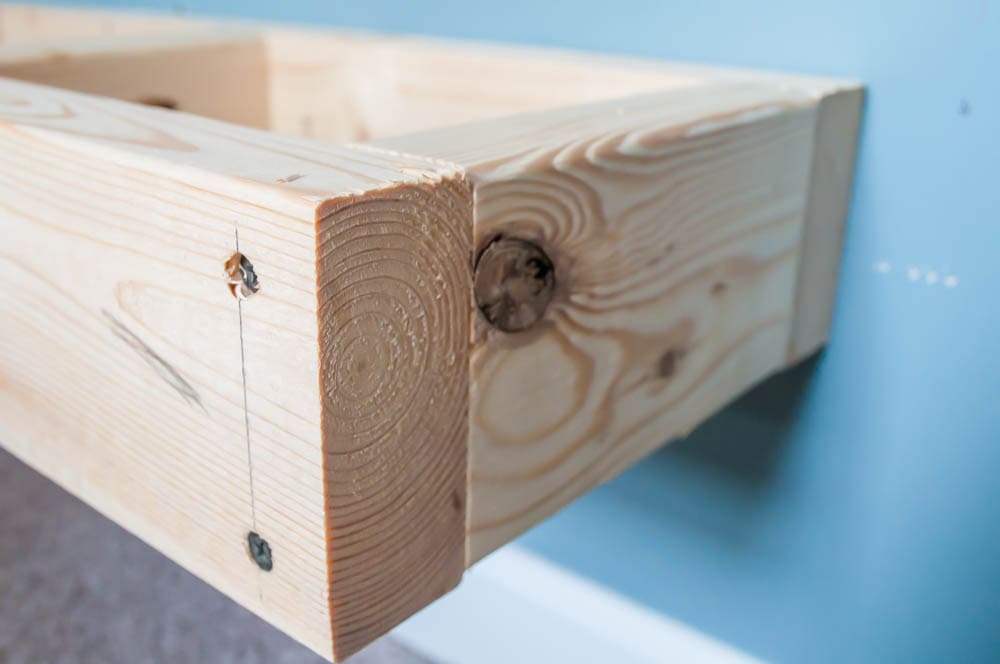
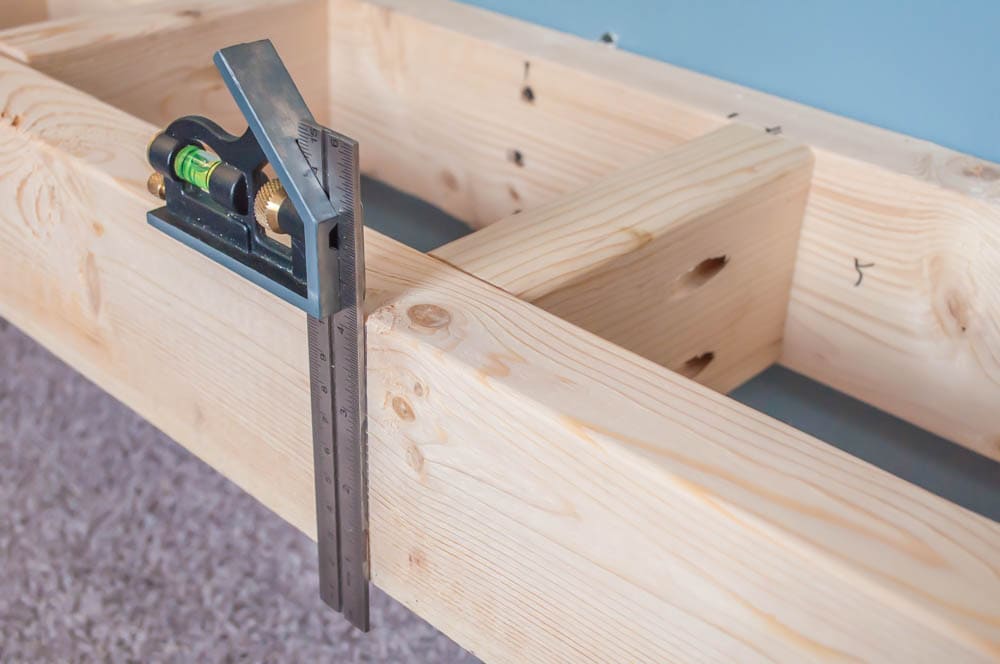
First, mark the location of the edge support pieces onto your front piece. To do this, measure 3/4″ in from the edge of the front board piece and draw a line using a pencil. We used a combination square for this step.
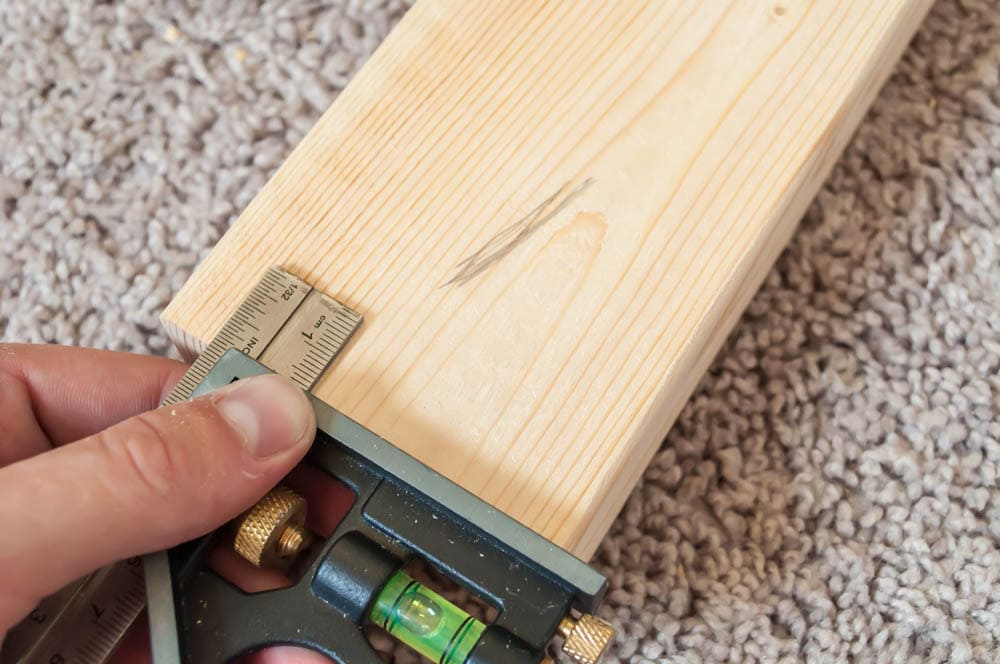
This line is the center line for support piece that will be behind the front board.
Drill 2 pilot holes through the front piece along that line.
Repeat this process for the support piece at the other edge of the shelf.
Then, attach the front board to the edge support pieces using 2.5″ drywall screws.
Once the front board is held in place by the screws on either end, you can then to attach the front board to each of the middle support pieces.
Use a combination square to draw a pencil line at the center of each intersection of the front board and the support piece.
Then drill two pilot holes through the front board but make sure you stop right before the drill goes into the support piece.
You don’t want to drill all the way through to the support piece because the screw won’t have anything to grab onto.
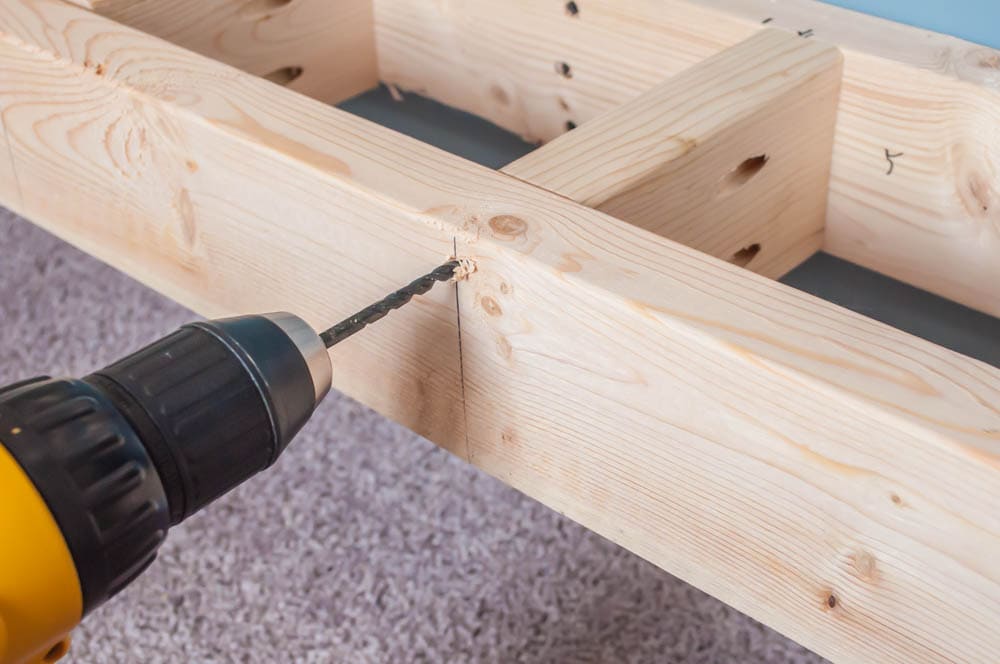
Next, attach the front board to each of the middle support pieces with 2.5″ drywall screws.
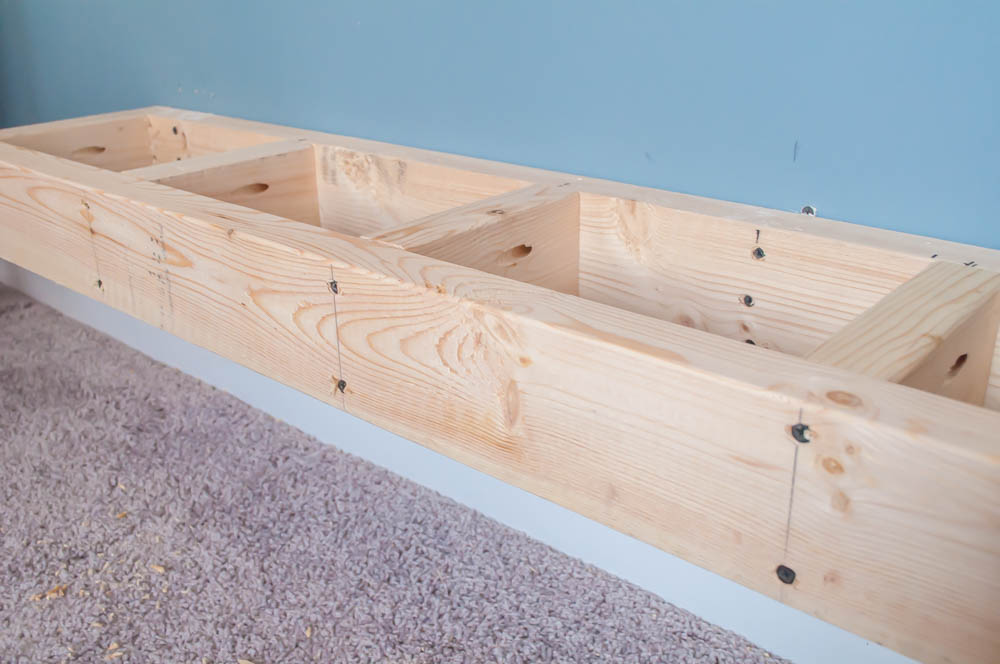
Repeat this process for each of your floating wall mounted shelves. Now you have a completed frame for each shelf.
To clean up the shelf frames, trim and flatten all of the joints with the block plane, razor saw, and sandpaper to make everything level.
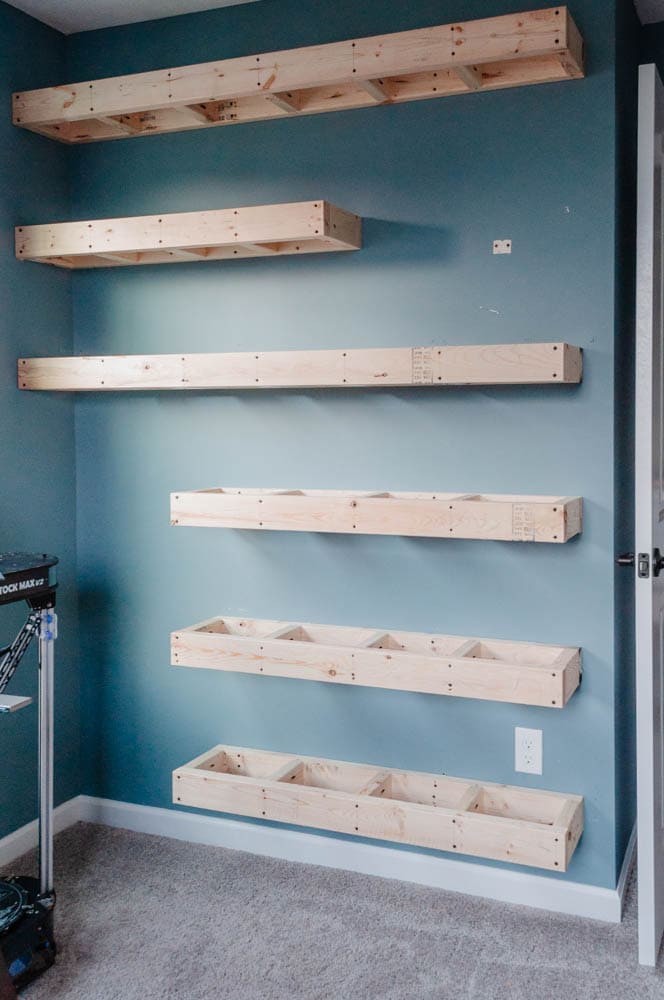
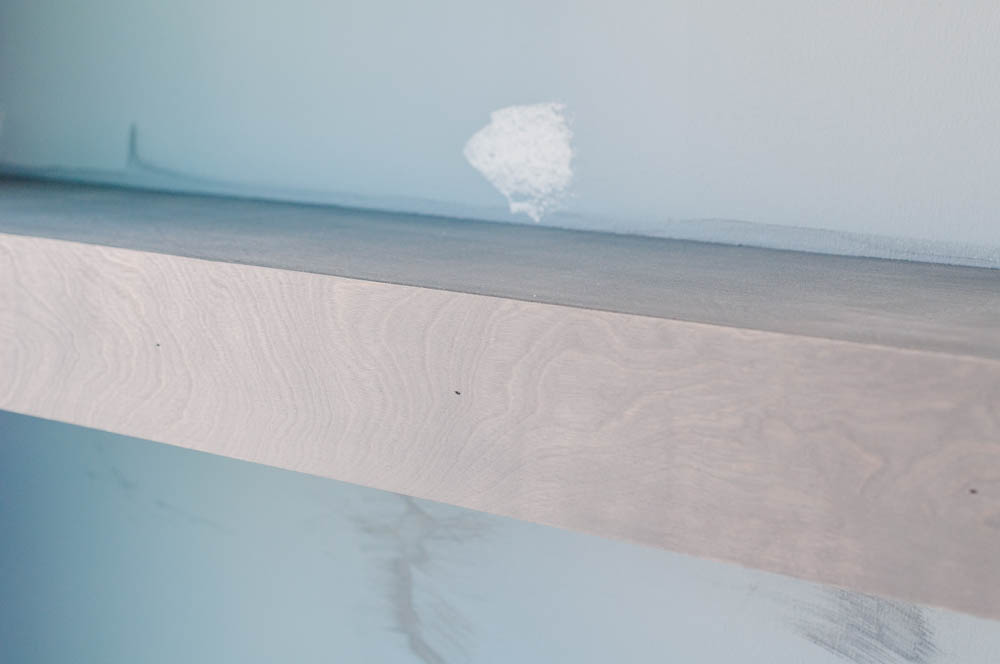
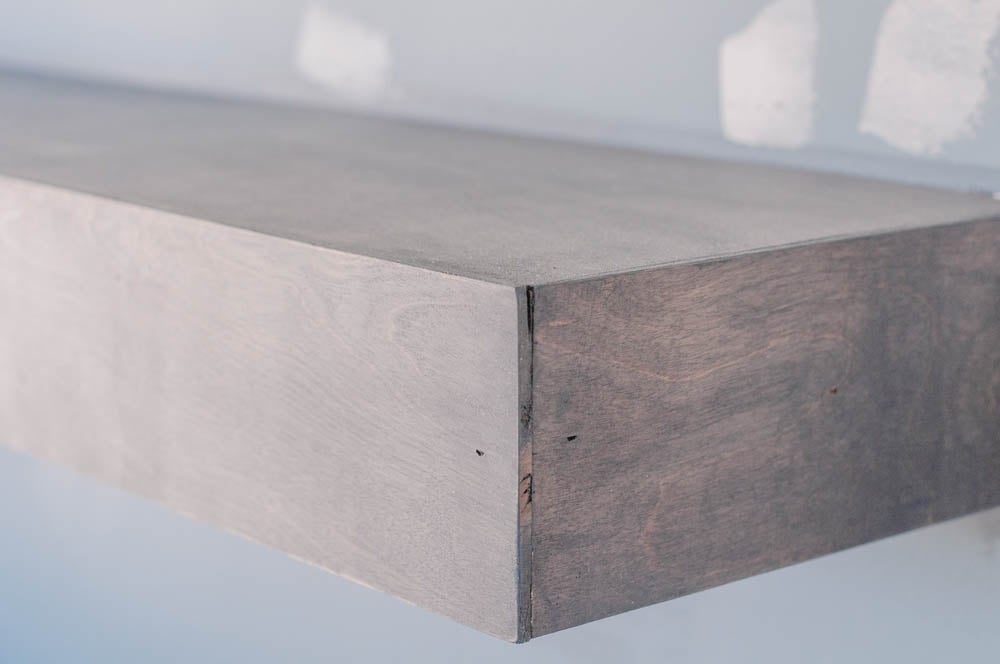
Plywood Wrap for Floating Shelves
Next, it’s time to cover the installed shelf frames. This will hide the support pieces and create the look of floating shelves. This is what gave our shelves a much more finished look.
To create this look, you will wrap each of the shelves in plywood which is a very common board.
We purchased large plywood sheets for this project from our local home improvement store. These pieces were very large, so we started by cutting them down into more manageable sized strips. Each strip was slightly larger than our shelves, measuring about 8′ long and 12″ deep.
Once you have your plywood ready, you will need to mark the exact size of your shelves.
Use a measuring tape to measure each shelf. Then, use a pencil to mark a link on your plywood at that length.
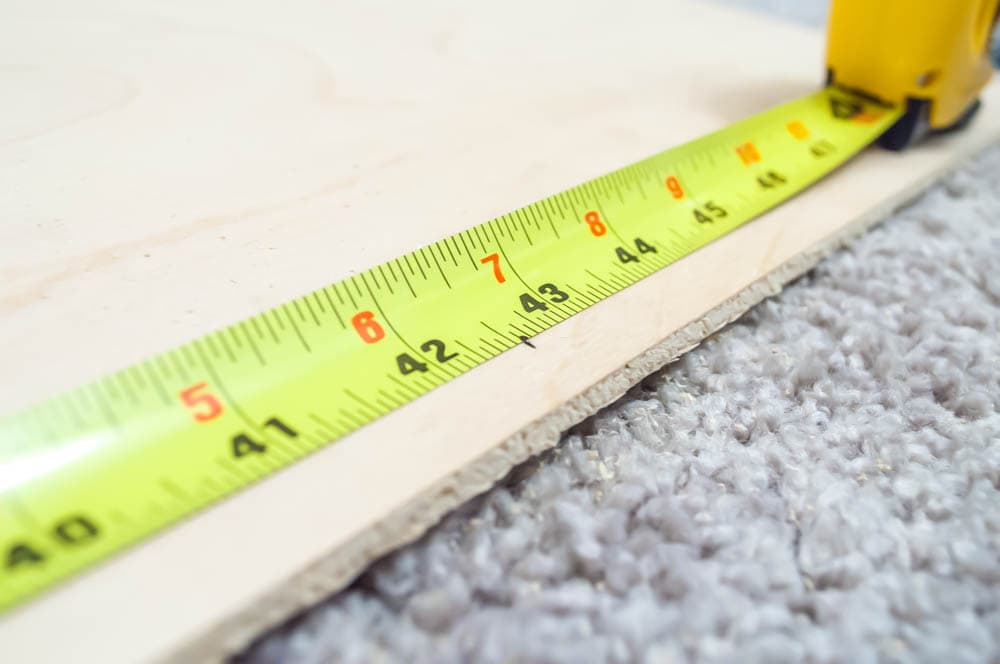
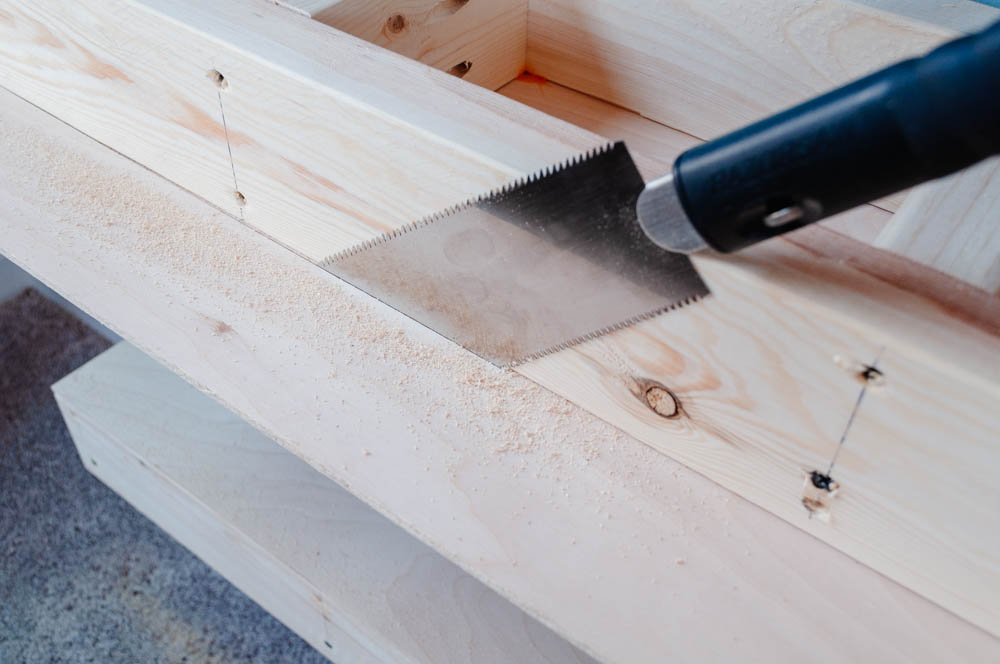
Use a razor saw to cut the plywood sheet to the overall length of your shelf.
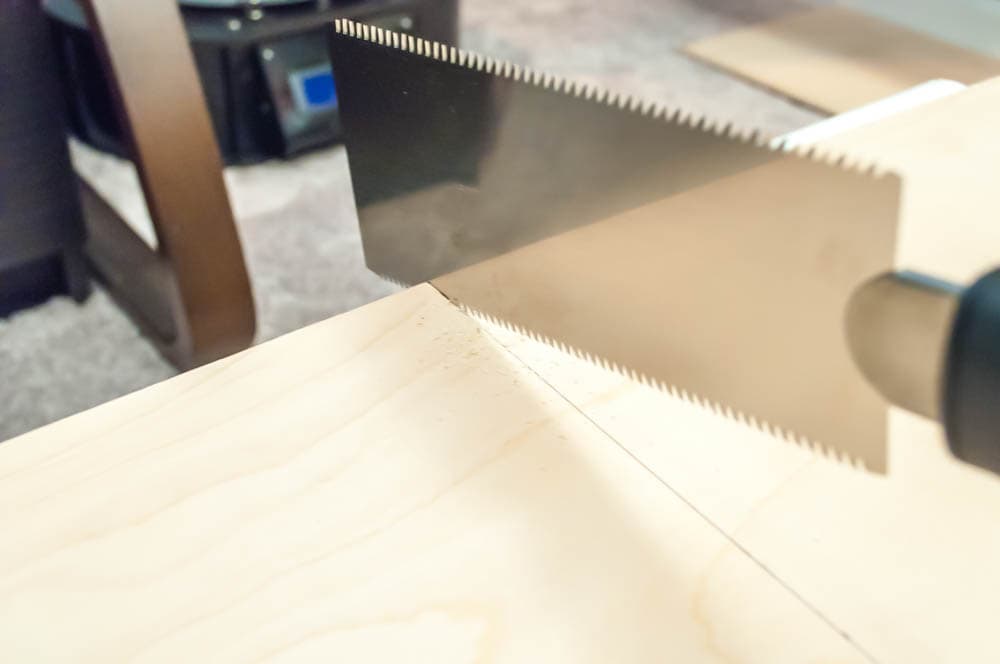
After the plywood sheet is cut to size, use wood glue and a brad nailer to attach it to the top of your shelf frame.
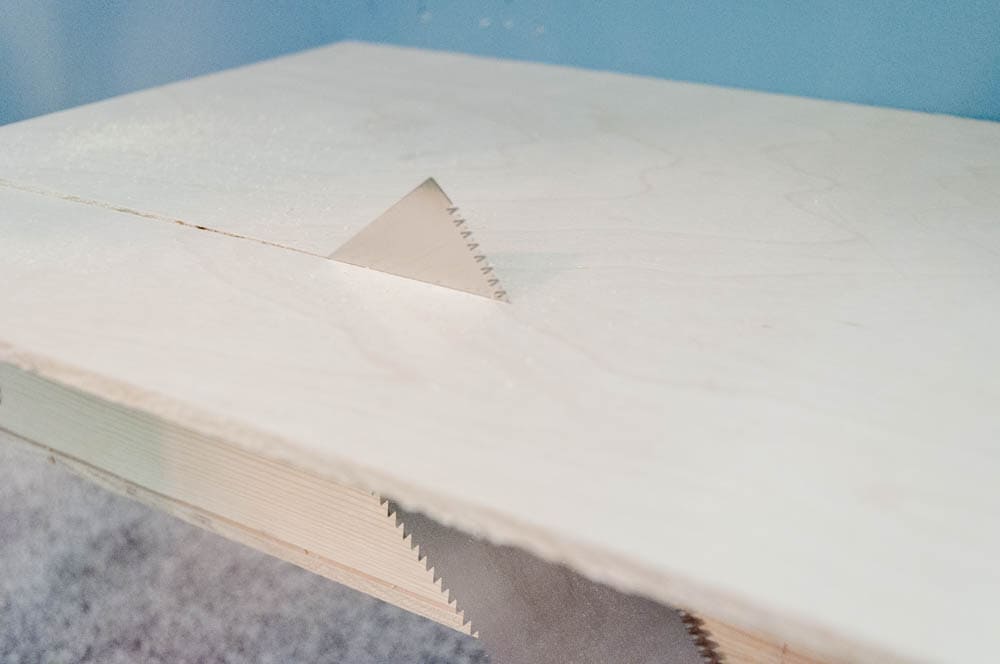
To get a perfect fit, you should cut the depth of the plywood after it’s attached to the frame.
After your plywood sheet has been attached to the frame, use a razor saw to flush-cut the plywood against the front board of your shelf.
Repeat this process the wrap the bottom of each shelf frame with plywood to create the shelf bottom pieces.
Again, use a razor saw to flush-cut the plywood to the correct depth once it’s already been installed on the shelf frame.
Use this same method to wrap the sides of each shelf frame with plywood to create the side pieces.
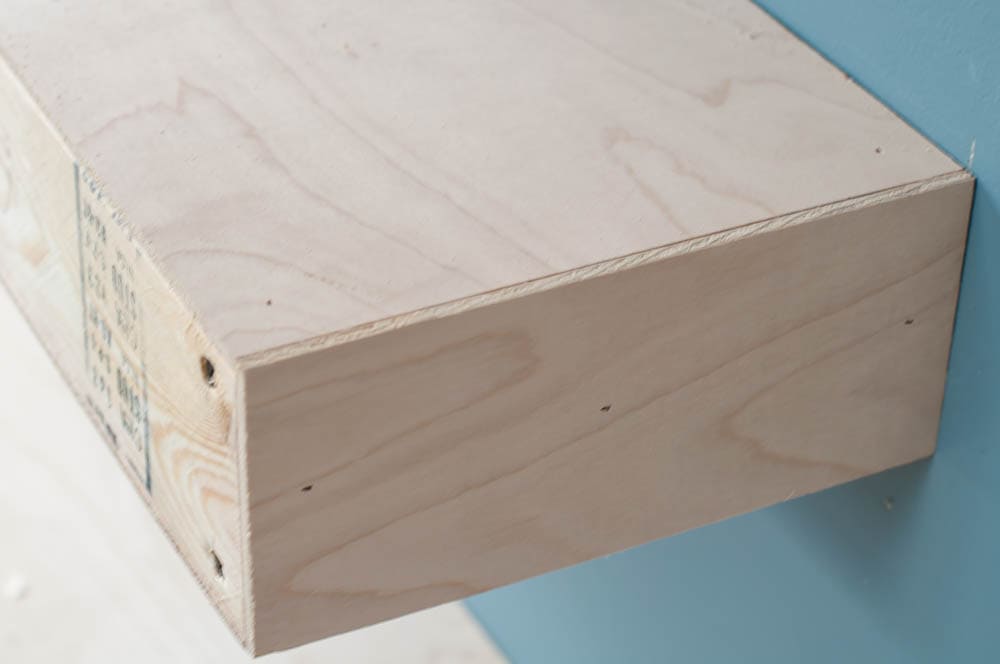
Finally, wrap the front of the shelf frame with plywood using the same method.
Make sure to wrap the front in plywood last. You want the front piece to cover all of the other plywood edges and create a more seamless look.
Repeat this process for all of your shelf frames until everything has been wrapped in plywood. You’ll be left with built-in shelves ready for finishing.
Finishing Touches for the Floating Shelves
After all of the floating shelves are wrapped with plywood, you will want to sand everything down so there is no sharp edge. Make sure all of the plywood is smooth.
Use 220 grit sandpaper for a super smooth finish.

After sanding, wipe all the shelves down with a damp cloth to get rid of the dust.
Staining Floating Shelves
To finish your floating shelves, you can either stain or paint them.
For Ben’s office bookshelves, we decided to stain the shelves so that we could still see the wood grain.
We tested a few stain color samples using some scrap plywood that we had leftover. We eventually settled on a grey tinted stain from Minwax.
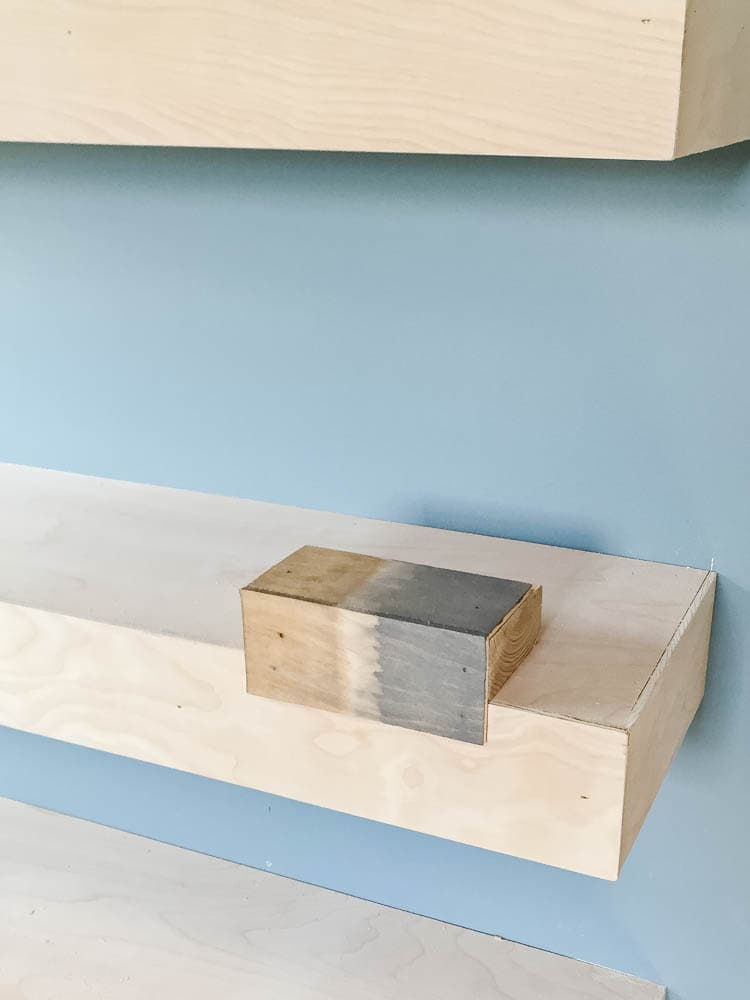
Tinted stains are great because they have a variety of different color options. But if you want a more natural wood look, use a regular wood stain.
To stain to your floating shelves, use a foam brush and brush on thin coats of the stain. Then, use a paper towel to wipe away the stain.
Work on one side of each shelf at a time, coating the entire surface, and then wiping off the stain. This will allow enough time for the stain to soak into the wood without getting too dark.
When you are staining wood, it’s important to wipe off excess before it dries. This is why we recommend working in sections instead of staining all the shelves at once.
Once the stain has dried, lightly sand everything again in preparation for the polyurethane. Make sure to use a damp cloth again to wipe off all of the dust.
We chose a satin finish polyurethane because we didn’t want a high gloss look.
Using another foam brush, apply the polyurethane in one thin coat over all the surfaces and let it dry for 3-4 hours.
After the first coat is dry, lightly sand all the surfaces again and Use a damp cloth to remove all of the dust from the shelf top.
Then, apply a second, final coat of polyurethane using a foam brush.
Let your floating shelves dry completely overnight.
After the second coat had dried, there were some areas of our shelves that looked a little glosser than we wanted.
To tone down any glossy spots on your shelves, use some #0000 steel wool to lightly buff some of the gloss away.
Finally, touch up any wall paint around your floating shelves.
Decorating the Floating Shelves
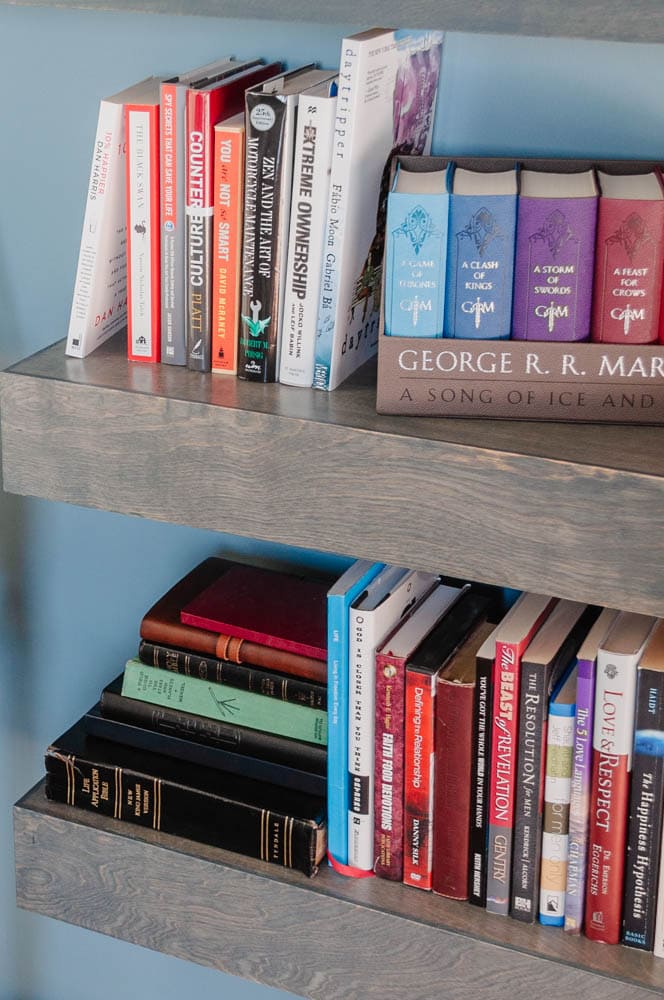
To decorate the floating book shelves in Ben’s office, we used a mix of books and meaningful items.
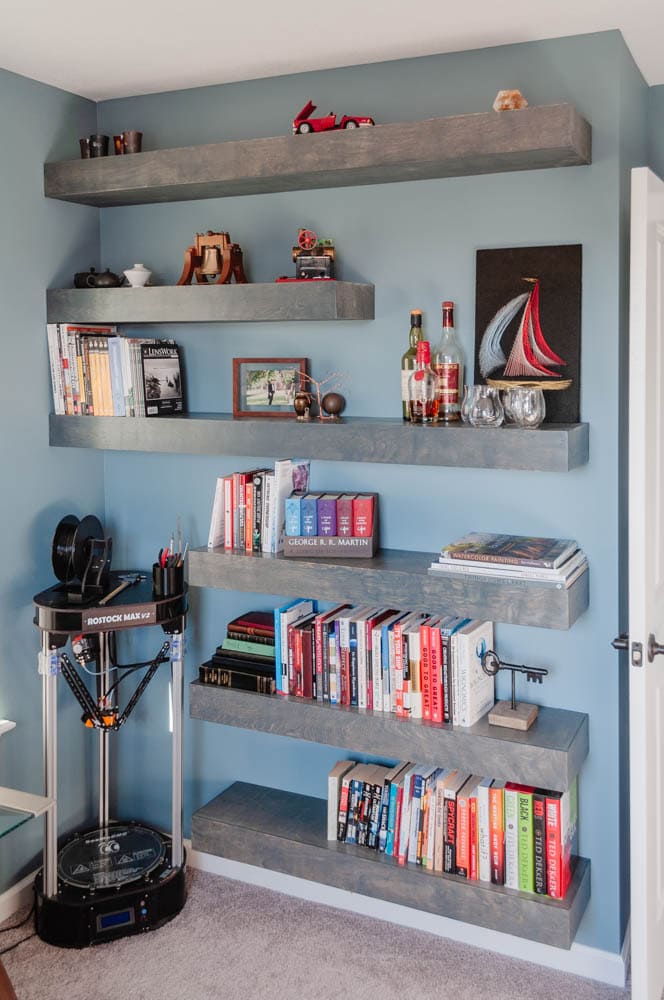
Ben needed storage primarily for books, and extra space to add more books in the future. So we arranged his existing books around the different shelves.
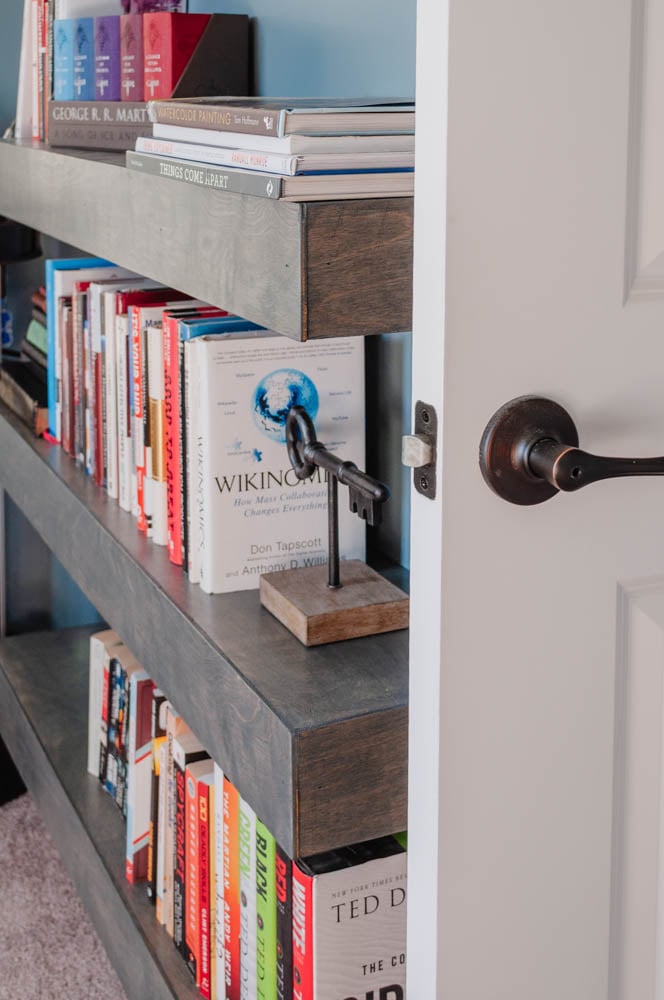
Then to balance the books, we added in collectibles, and memorable items to add a personal touch to his space.

Now that Ben has shelves covering the entire wall, there is so much more storage. It feels less cluttered because nothing is crammed together on his desk or small bookshelf anymore.
He finally has room for all of his books and can actually access them easily now.
Final Thoughts on DIY Floating Shelves
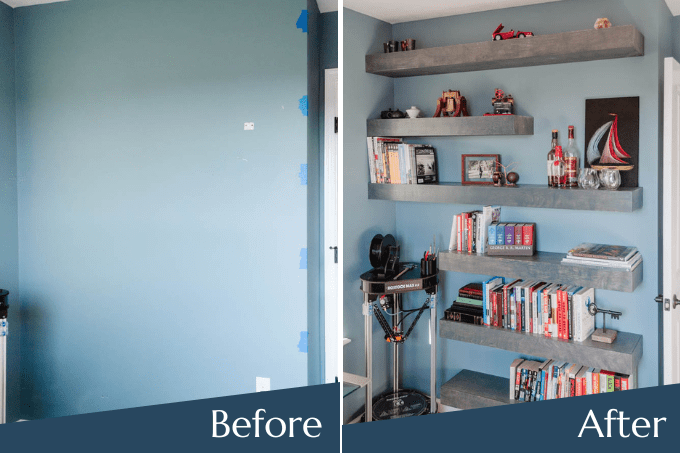
Floating shelves are a great way to add storage and style to any room of your home. By creating a full wall of shelves, we were able to give Ben much needed extra space. As well as a way to display personal items as well.
You can make floating shelves for any room of your home on a budget. One of my favorite ideas is creating kitchen shelves using this technique. They can completely transform a space and create a huge impact.
These shelves made such a difference in Ben’s office and I was surprised at how much storage we got for how much we spent on the materials. For under $150 we were able to create completely custom wall mounted shelves.
I hope that this project inspires you to add some floating shelves in your own home.
More DIY Projects
- IKEA Lack Floating Shelves in the Living Room
- Updated White Oak Wall Book Shelves Ben’s Office
- 10 Creative Accent Wall Ideas for Your Home


I’m going to make this for my office, master bedroom and living room. I’ll let you know how they turn out.
Steve
My wife wants to do this in our kitchen. We have a 1903 Victorian. We need more room for cooking. We cleared a wall. She wants cabinets with formica top on the bottom. Floating shelves above. I like your idea best of all the designs yet. Here we go. Dan.Dan
How much weight do these shelves hold? Thinking on pantry but want to make sure they are sturdy enough.
Honestly, I’m not sure how much weight they will hold. In a pantry I would suggest adding side supports because pantry items can be heavier.
LOVE this color! Unfortunately they no longer make graphite. Looking to have one of these built (under my mounted tv) and want it to pop against my lighter gray walls. Rust-oleum has a carbon gray and is the closest I’ve found. I’ll take any input on color and brand.
Oh no! I didn’t realize it was unavailable. I think anything with a slightly gray undertone rather than a yellow or orange stain undertone will look good! It definitely doesn’t have to be exact. See if you can test it on a piece of wood first before you stain the shelves.
Christene