How to Build a Wood Trim Accent Wall
One of the easiest and more affordable ways to add visual and architectural interest to a room is by adding wall molding (or wall moulding).
It’s a simple and effective way to make your home look more custom.
Whether you want to make a statement in your living room, add some drama to your master bedroom, or define the dining space within an open floor plan, a wall molding accent wall is a modern and easy way to do it.
Accent walls can be used to create a focal point in a room or add some visual interest to an otherwise plain or boring wall.

Not only do accent walls add character to a space, they can also help to define the layout or flow of a room. Especially if that room is part of an open concept space.
If you’re looking for an easy and affordable way to create a board and batten accent wall in your own home, wall moulding is a great option.
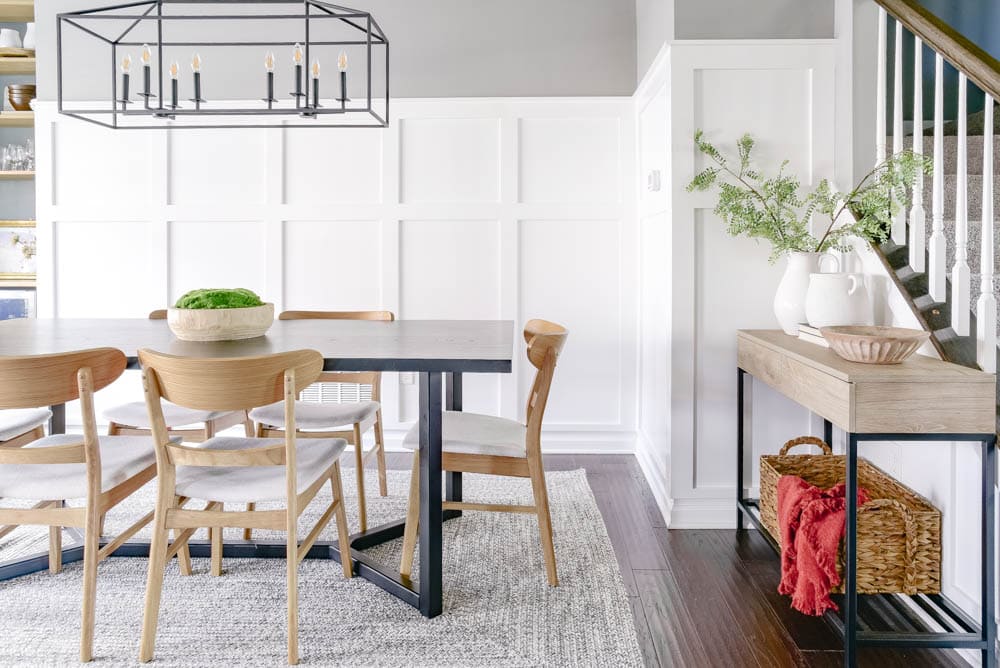
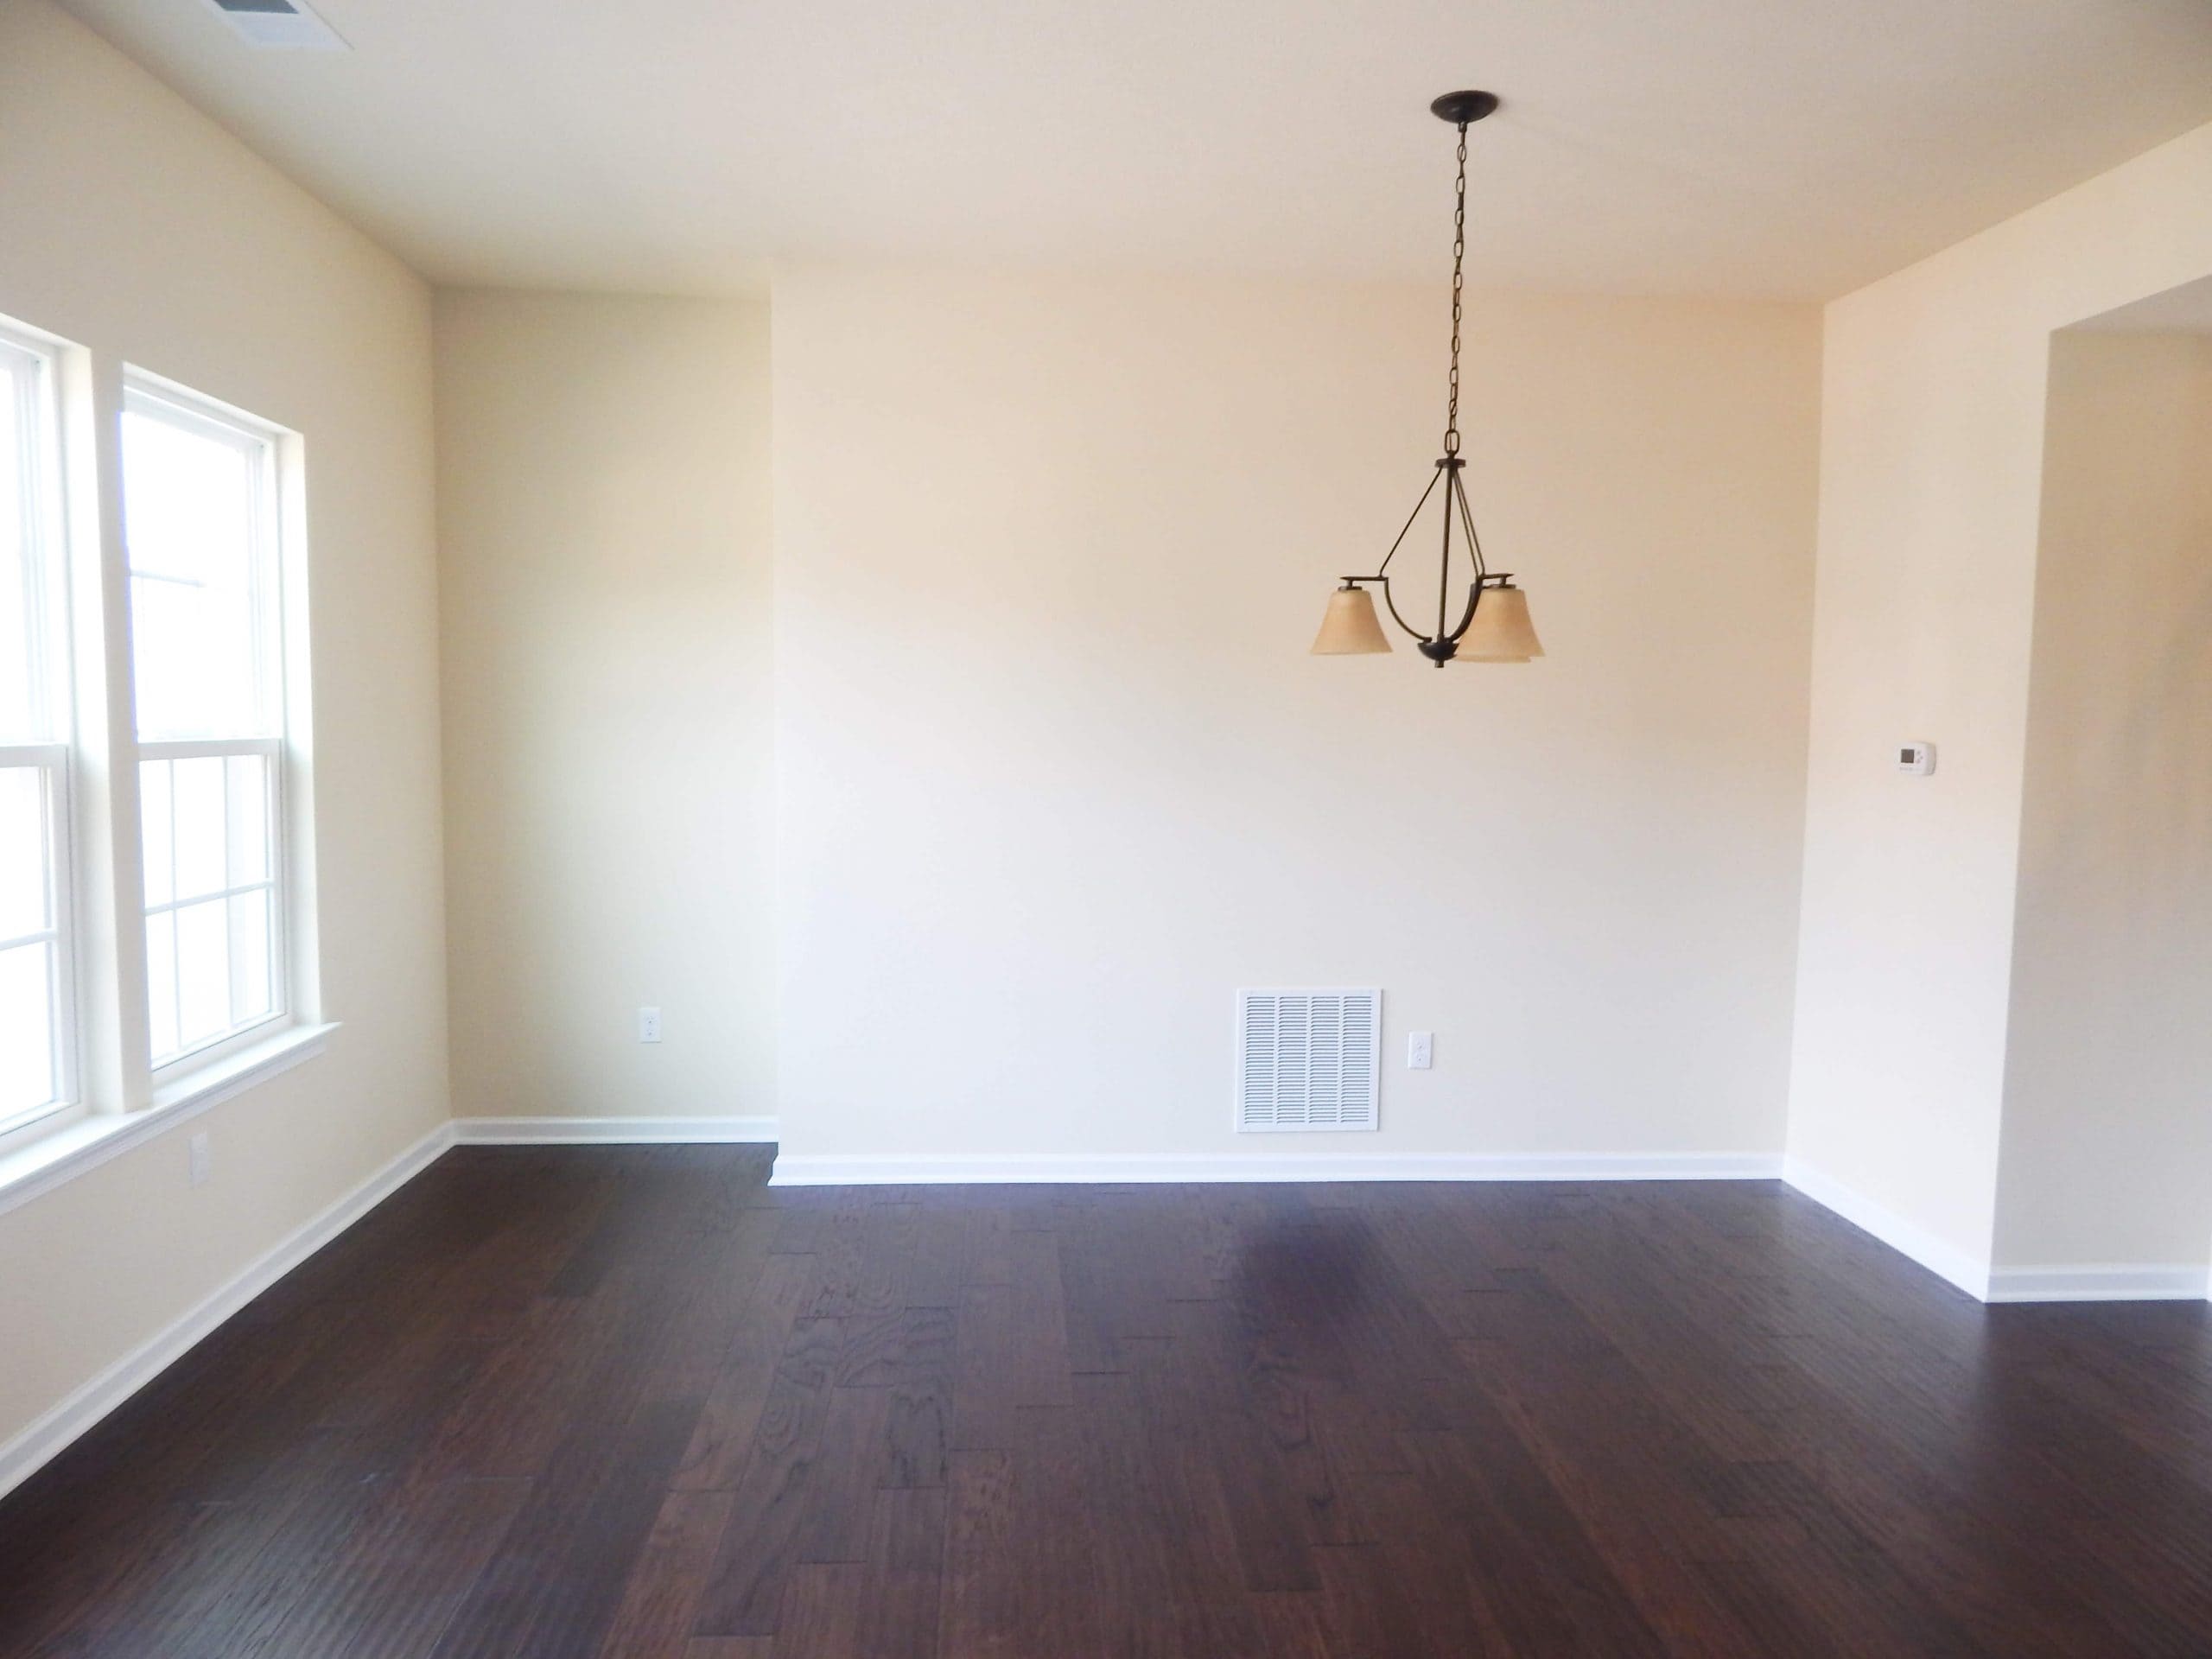
The dining room in our new home was looking a little basic and boring.
While it did have tall ceilings, lots of natural light, and convenient access to the kitchen, it didn’t quite match the overall vision I had in my head for the space.
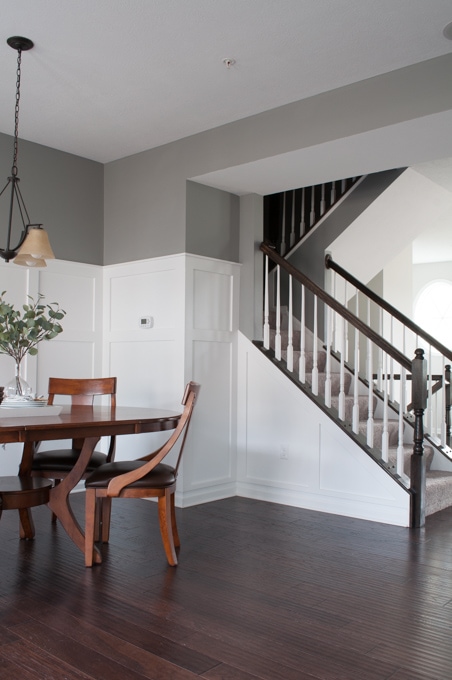
To set the dining room apart from the kitchen, and really define it within our open floor plan, I decided to create a board and batten accent wall using wall molding.
This DIY project was the easiest way to make a huge impact on the overall look and feel of the dining room.

If you have basic carpentry and DIY skills, and a passion for home projects, this trim accent wall idea is perfect for you.
Even though it may seem like a complicated type of project, don’t be discouraged! Once you get the first horizontal piece in place, the rest of the process is just a matter of repetition.
The end result is a beautiful board and batten wall that is well worth the effort. Let’s get started with the step-by-step instructions!
This post contains affiliate links for your convenience. For more information, see my disclosures here.
Materials
- 1 x 4 MDF boards
- 1 x 2 MDF boards
- Wood Glue
- Spackle or Wood Putty (Wood Filler)
- Caulk
- Primer
- Paint (We Used White Semi-Gloss Trim Paint)
Tools
- Tape Measure or Measuring Tape
- Miter Saw
- Nail Gun (Brad Nailer) and Brad Nails
- Level or Laser Level
- 220 Grit Sandpaper
- Caulking Gun
- Caulk Scraper or Caulk Smoother (optional)
- Foam Paint Roller
- Small Paint Brush
- Large Handy Paint Tray or Paint Tray
- Painter’s Tape (optional)
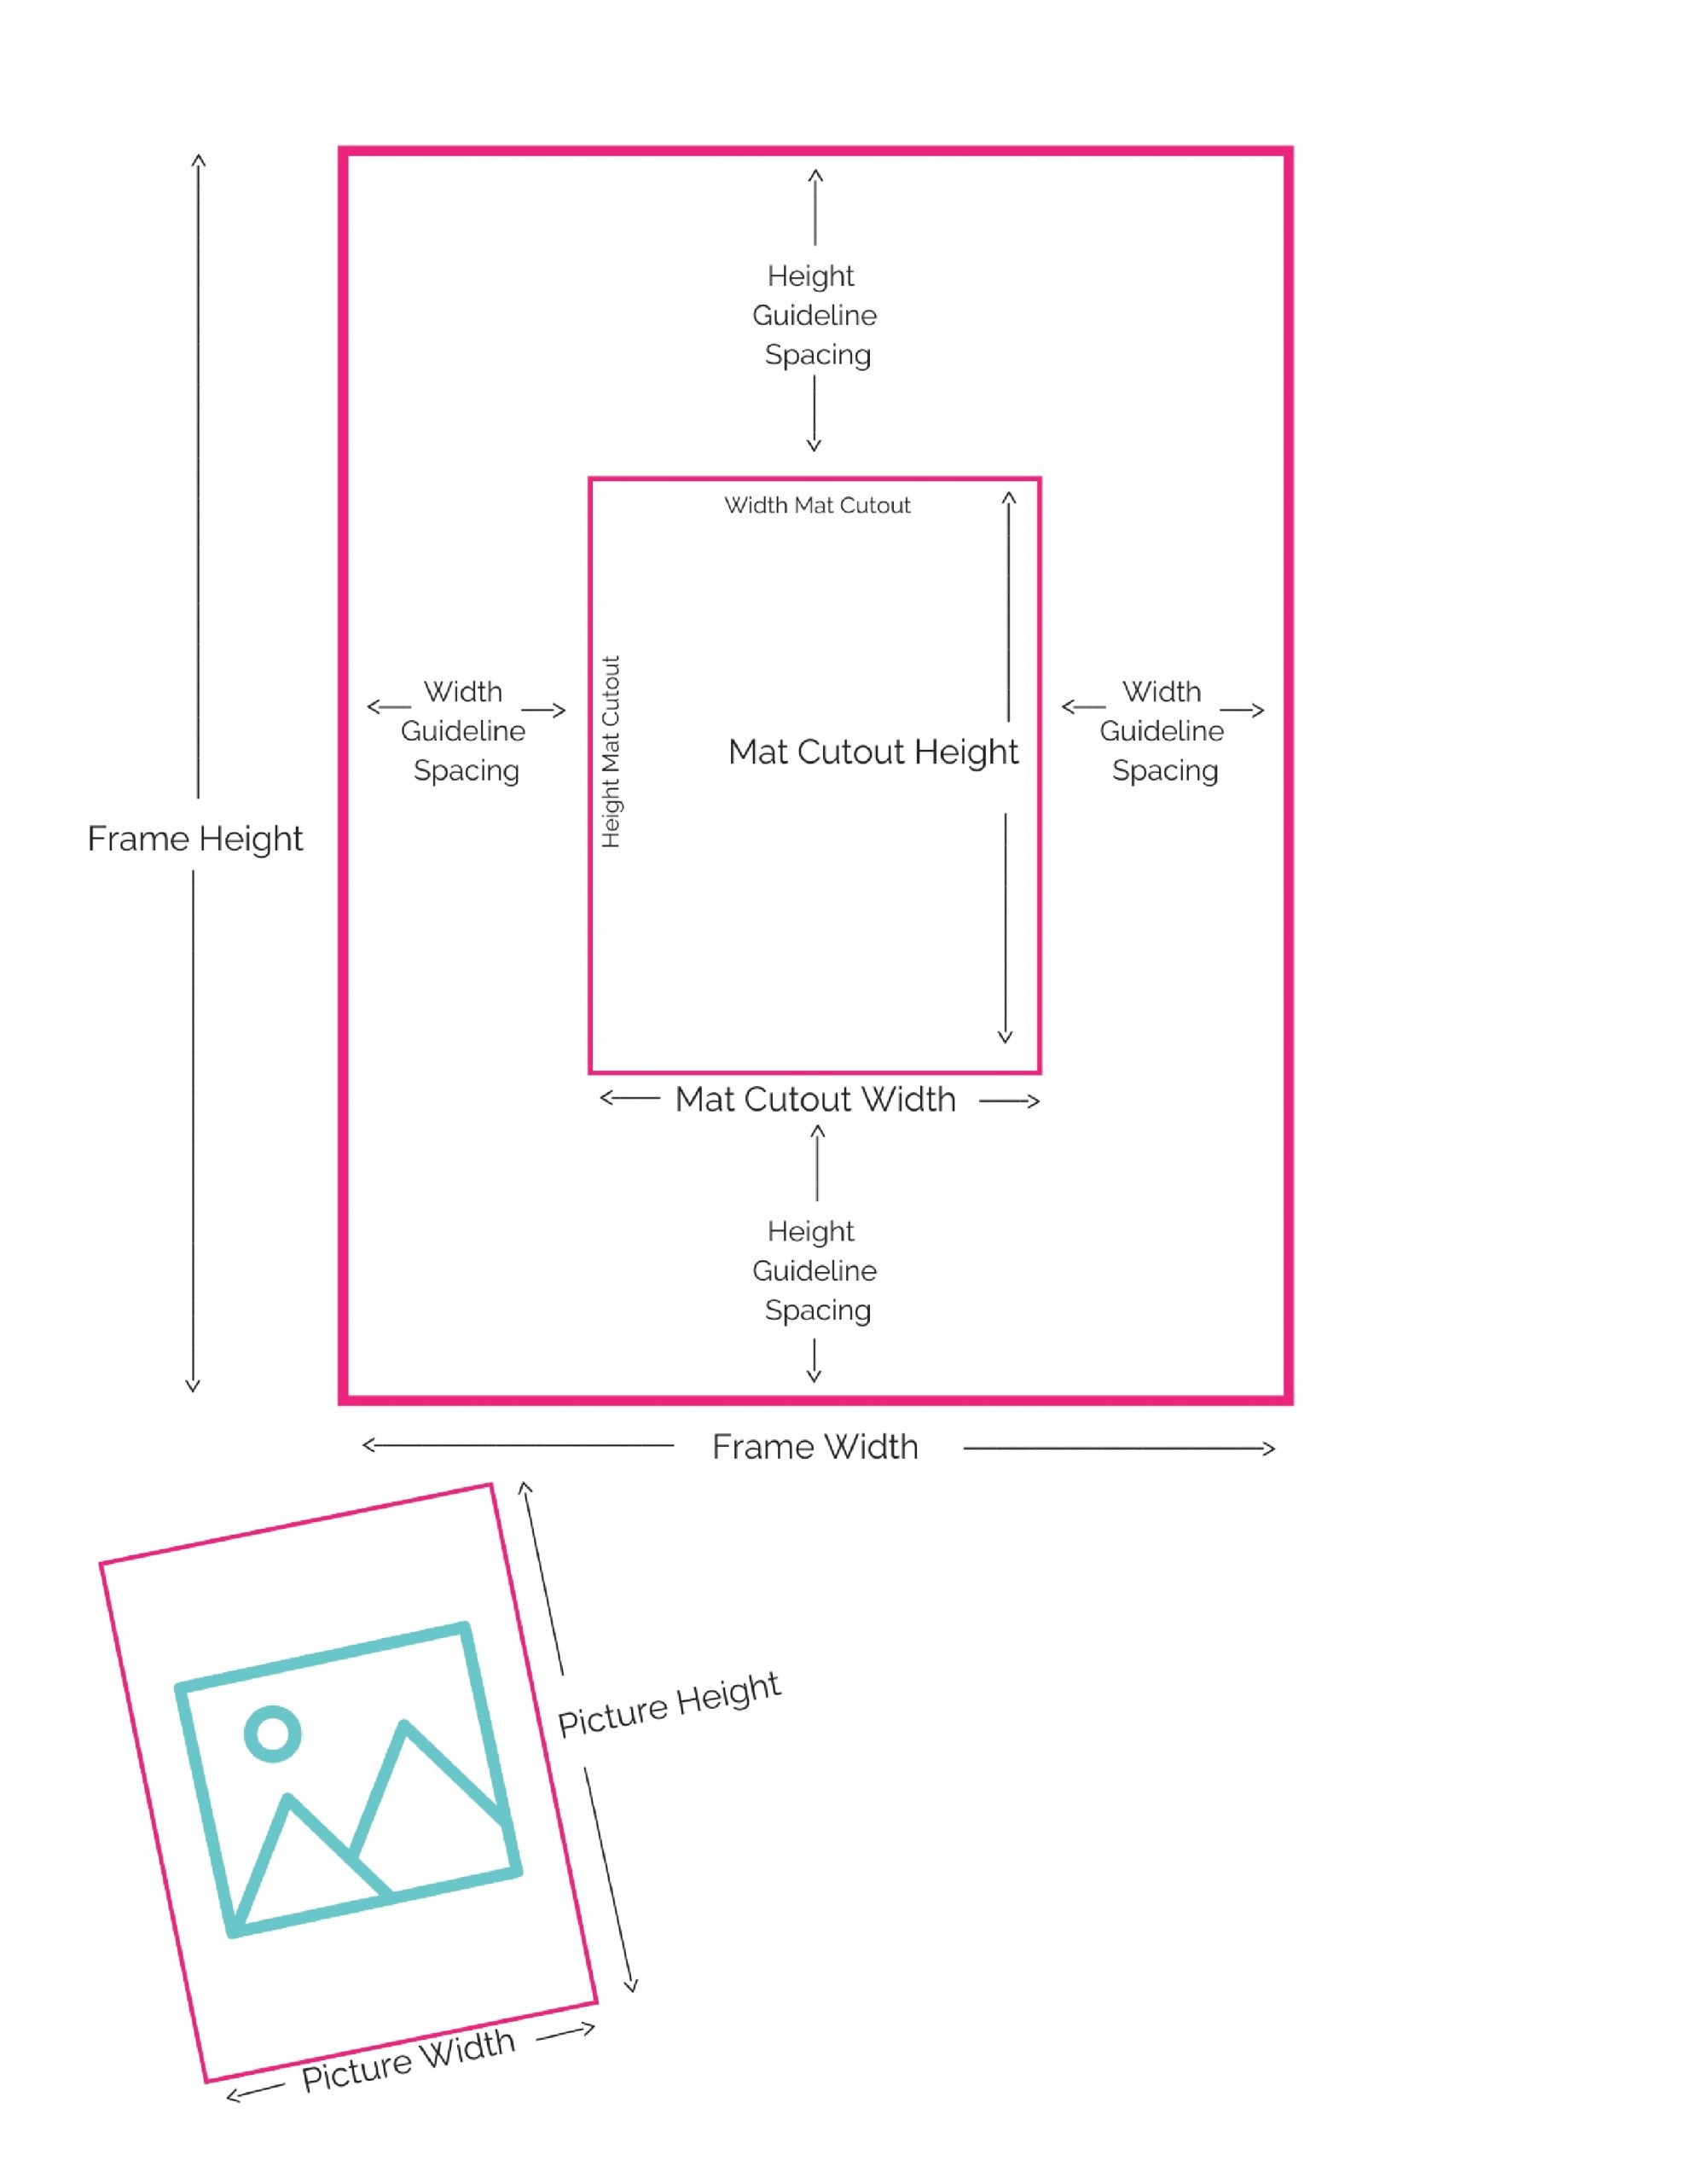
1. Measure and Plan the Accent Wall Design
Before starting this project, it’s important to do some planning and preparation. The first step is to sketch a rough drawing of the entire wall and measure its dimensions.

Measure the Wall
You want to get an overall measurement for the size of your wall. Measuring the width and height of your wall will help you determine how many vertical and horizontal pieces of molding you’ll need.
You will also need to decide on the style of wall molding you want for your accent wall.
Accent walls can have many different looks. You can create a grid wall, a rectangular design, or create a more modern wood accent wall.
You could also create a more traditional accent wall using chair rail or picture frame molding. There’s tons of design options for you to choose from to create a custom look with your own DIY accent wall.
Related: DIY Grid Board and Batten Accent Wall
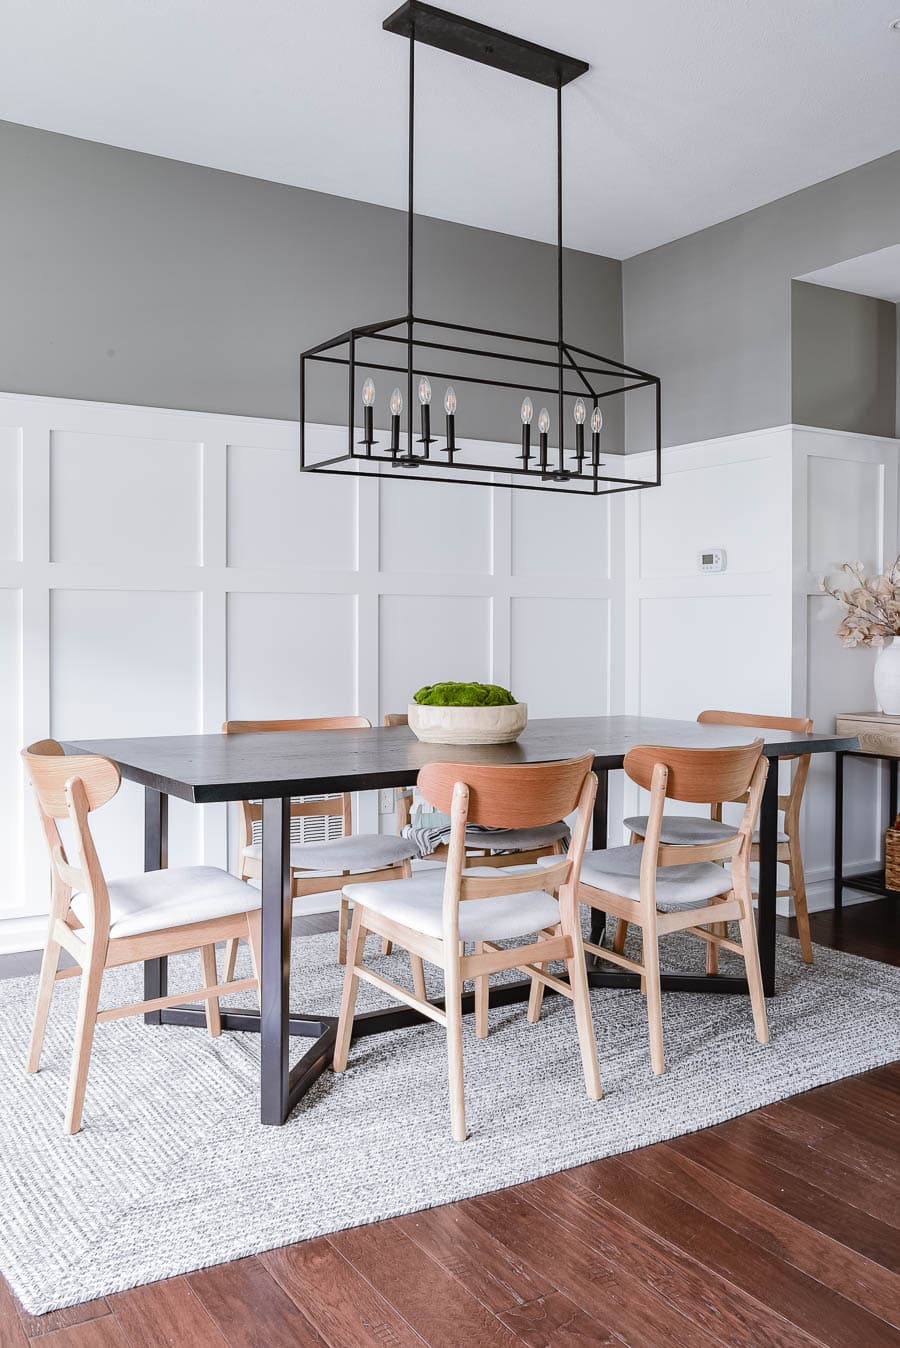
Our ceilings are 9 feet tall. We wanted our board and batten to go up about ⅔ of the way up the wall height, which is 6 feet high.
This is similar to a half wall board and batten, however we wanted ours to be a little bit taller.
Consider any features on the wall that you’ll need to work around, such as outlets, thermostats, or grates.
If you look closely at our dining room, we had a couple of things to work around like a grate, a wall outlet, and a thermostat.

For our project, I created a sketch on graph paper of the wall with the measured dimensions and made sure to take note of where the extra features were located.
Design the Board and Batten Layout
To design the layout of your board and batten wall, you’ll need to divide the wall into equal segments using the size of the vertical battens.
We decided that 4” wide boards would be the best size to use for all of the battens (wall moulding).
Keep in mind that actual board sizes may differ from their nominal dimensions. For example, a 1 x 4 board is actually closer to 0.75 inches x 3.5 inches.
Once we determined the size of the vertical battens and measured the overall wall, we were able to calculate the width of each board and batten segment needed for the wall.
Using our measurements for the main wall, we determined that this main section should be split into 5 even segments.

The two side walls, which were also smaller, were each designated as their own segments.
We initially considered dividing the smaller wall with the thermostat into two segments, but found that it was more noticeable to have very small segments rather than one larger segment.
After considering our options, we ultimately decided to create one larger board and batten segment for the smaller wall on the right.
The angled wall by the staircase was divided into two segments.
Determine How Many MDF Boards You Will Need
Using your wall measurements and the number of vertical battens you’ll need, you can calculate a rough estimate for the overall length of the boards you’ll need. This will give you an idea of how many MDF boards to buy for the project.
It’s always a great idea to add a little extra to your estimates and purchase a few spare boards. Just in case of any mistakes or unexpected issues. This will help ensure that you have enough material to complete the project.
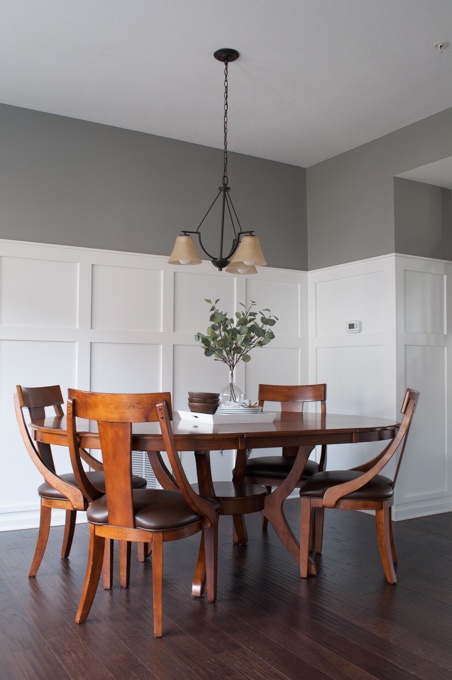
Our Dining Room Board and Batten Design
Here is the overall design of the board and batten wall we designed for the dining room.
The wall moulding goes about ⅔ of the way up the wall to 6 feet tall. The lower part of the wall molding is a large rectangular section, while the upper part is a smaller square section.
2. Prepare the Accent Wall
If the color of your wall is significantly different from the wall molding color you are designing, you may want to prime the blank wall first. This will ensure that the original color will not show through once your accent wall is complete.
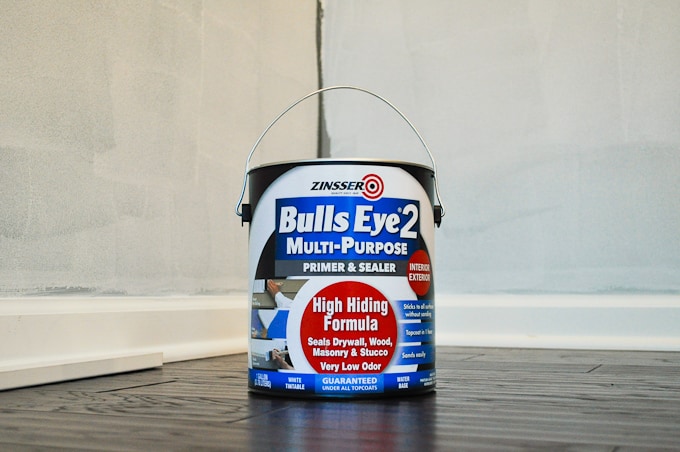
Before attaching any boards to the wall, the first thing we did was apply a coat of Bulls Eye 2 Multi-Purpose Primer and Sealer to the entire accent wall area. This helped to cover up the existing gray color and made it easier to paint over once the board and batten wall was complete.

You will also want to remove any outlet covers, light switches, grates, thermostats, and any other features on your wall before you begin.
3. Install Wall Molding
Install Base Trim Piece
For this DIY project, we wanted to install the board and batten without removing the existing baseboards.
To avoid removing the existing trim, we decided to add a small piece of 1 x 2 MDF board horizontally above the baseboards to give the appearance of a thicker trim.
This horizontal board, which actually measures 0.75 inches x 1.5 inches in size, allowed us to place the vertical battens directly on top of this new base trim piece, rather than creating an entirely new baseboard.
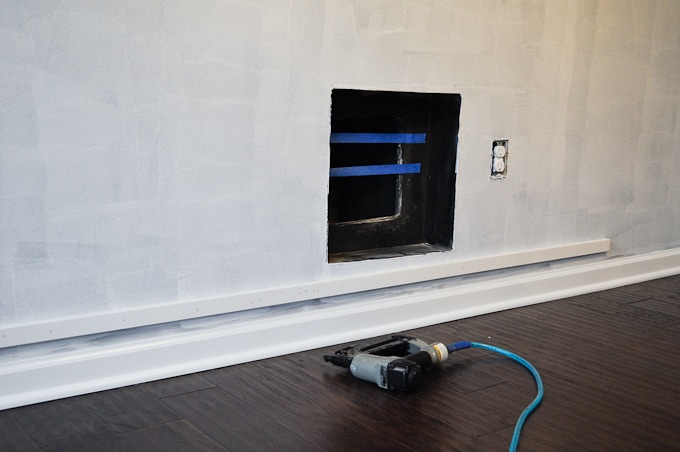
This helped us to get the board and batten look without having to remove any of our trim board at the bottom of the wall.
To install the wall molding trim horizontal pieces, we used a brad nailer and a level.
First, we attached the 1 x 2 trim pieces to the wall.
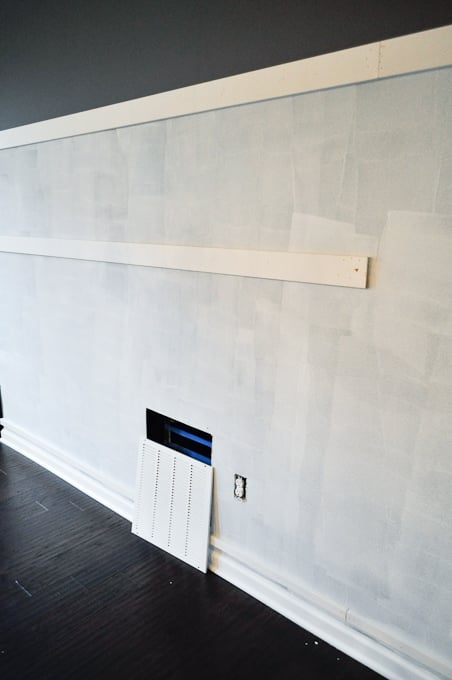
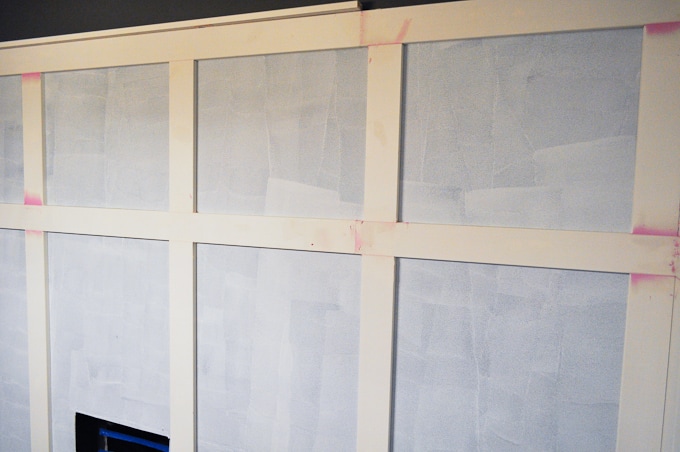
Install Top Horizontal Boards
The next step was to add a 1 x 4 horizontal piece on the top of the accent wall.

To create the top square section of each board and batten segment, we added another 1 x 4 horizontal piece 20 inches down from the top board.
We used a level to ensure that the boards were evenly spaced and properly aligned before we attached them to the walls with a nail gun.
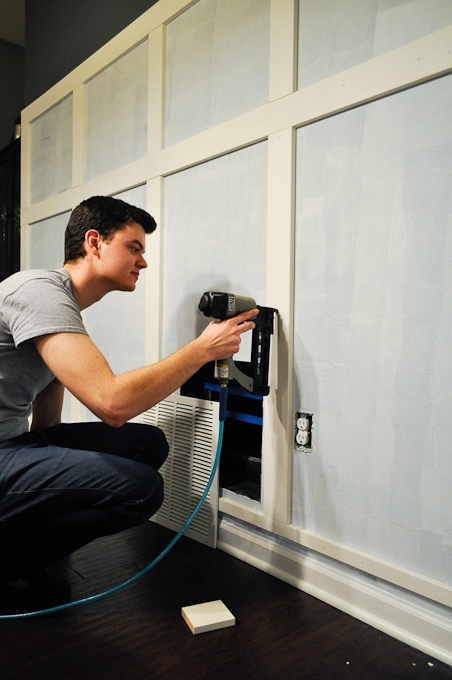
Install Vertical Board Pieces
Next, it was time to install the vertical boards.
We started on the left side of the main wall and measured the space for the first piece, which was a shorter vertical piece.

Using a miter saw, we cut the piece to fit. Then we used a nail gun to attach it into place on the wall.
Next, we measured the horizontal spacing segment and marked the location for the next shorter vertical piece.
Again, using a miter saw, we cut the next shorter vertical piece to fit and attached it to the wall with a nail gun.
We repeated this process with all of the short vertical pieces for the entire wall.
Next, we measured the horizontal spacing segment and marked the location for the next vertical pieces.
We then went back to the left side of the main wall and used a miter saw to cut the first longer vertical piece to fit. Then we used a nail gun to attach it into place on the wall.
We repeated this process of measuring and cutting each of the longer vertical pieces and attaching them until we finished the main wall, the smaller wall on the right, and the angled wall along the staircase.
It was important to measure each board individually due to slight variations in the levelness of our floors. This ensured that the vertical battens had a perfect fit.

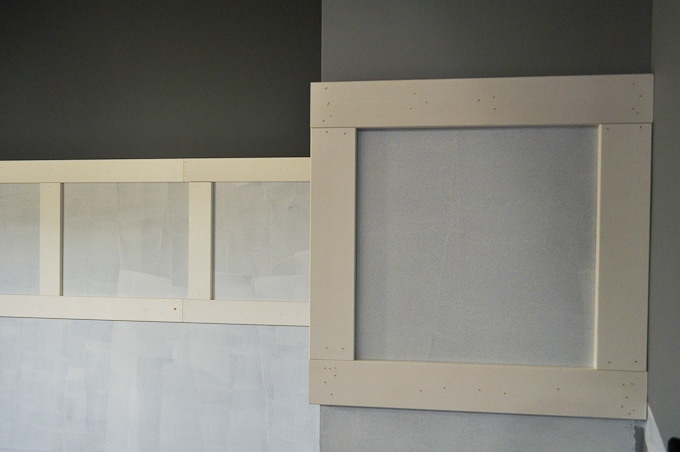
The 45-degree angle wall required a slightly different approach.
Since it was not tall enough to match the rest of the board and batten, we decided to frame the space with 1 x 4 MDF boards and add one vertical batten.

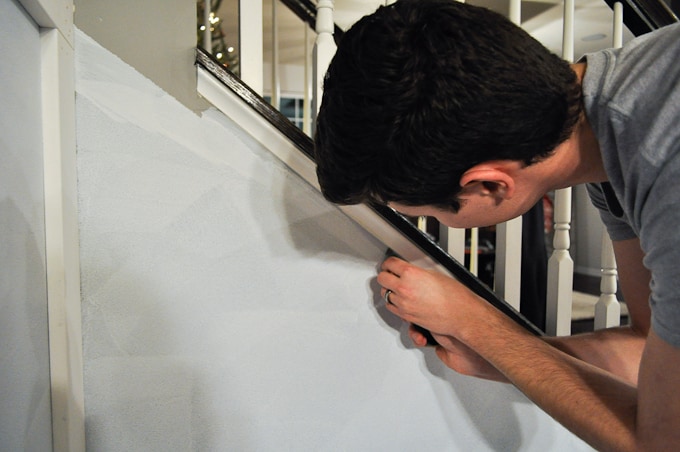
The stairs already had a decorative trim piece under the railing base, which we removed completely by cutting the caulk with a razor.
This allowed the top 1 x 4 piece to be flush against the railing base.
Install Crown Pieces
To complete the wall molding, we added a 1 x 2 MDF crown top piece above the uppermost horizontal piece.
Related: Easy DIY Geometric Wood Accent Wall
4. Add Finishing Touches
Spackle and Caulk
After all of the pieces were secured to the wall, we used spackle to fill in the nail holes. You can use either spackle or wood filler to fill holes in your accent wall.
Once the spackle is dry, sand it lightly with 220 grit sandpaper for a smooth finish.
To seal the space between a wood piece and the wall, you should use caulk.

Begin by applying a bead of caulk using a caulking gun. Then, use a tool such as a caulk smoother or your finger to smooth out the caulk.
This helps create a seamless, smooth finish and creates the look of a built-in piece.

We then let everything dry and removed any dust from the wall in preparation for painting.
Paint the Board and Batten
Finally, it was time to give the board and batten wall a fresh coat of paint.
We used a semi-gloss trim paint, which gave everything a glossy, finished look.
To apply the paint, I used a small foam roller for the spaces between the boards and a small angled paint brush for the sides of the board pieces on the wall. You could also use a paint sprayer for a quick and even finish.

After allowing the recommended drying time for the paint, I applied additional coats as needed. In total, I needed four coats of paint to fully cover the wall.
Once everything was dry, our DIY board and batten dining room accent wall was complete!
Finished Board and Batten Feature Walls
Before beginning this project, we had already painted the dining room a dark gray color. Initially, I thought this would create a nice contrast with the white board and batten accent wall.
However, once we finished the project, we decided to repaint the dining room in a lighter shade of gray called Valspar Hazy Stratus, which matches the rest of the open space and kitchen.
Related: Our Whole Home Paint Color Scheme
We found that this color looks better than the original, richer, darker shade we used.
Look at how much the board and batten trim moulding has transformed this space!
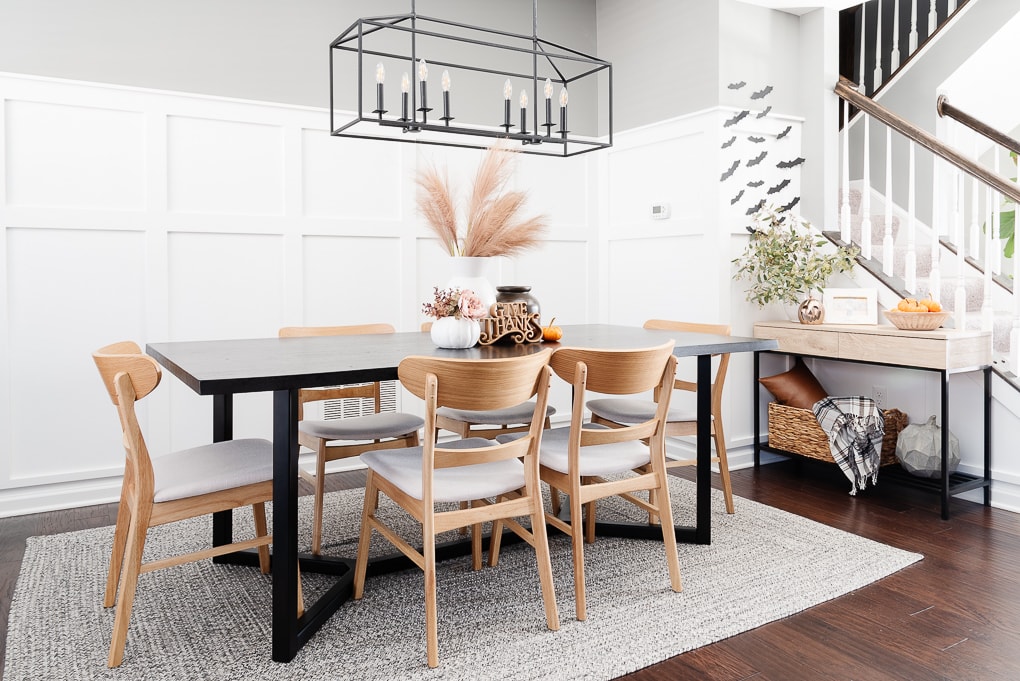
I’m really pleased with how it turned out. It’s exactly what I had in mind when I first came up with the idea of an accent wall, and it really helps define the dining room as its own separate area.
The tall style of moulding gives the room a custom, finished look, and the white paint color ties in beautifully with the kitchen.

Using wall moulding to create a board and batten accent wall is a simple, budget-friendly method for adding character and visual interest to a room.
With a little bit of effort and creativity, you can create a beautiful, custom-looking board and batten accent wall that enhances the overall look and feel of your space.
More Feature Wall Ideas
- DIY Board and Batten Bedroom Wall
- Easy DIY Geometric Wood Accent Wall
- DIY Wooden Pallet Wall
- Removable Wallpaper Accent Wall in a Home Office


Great job! Looks terrific!????????????
Thank You! I love how it turned out. Thanks for stopping by my blog 🙂
I love the style of board and batten you chose. It looks amazing!
Thanks Kati! I’m a big fan of the tall board and batten style 🙂
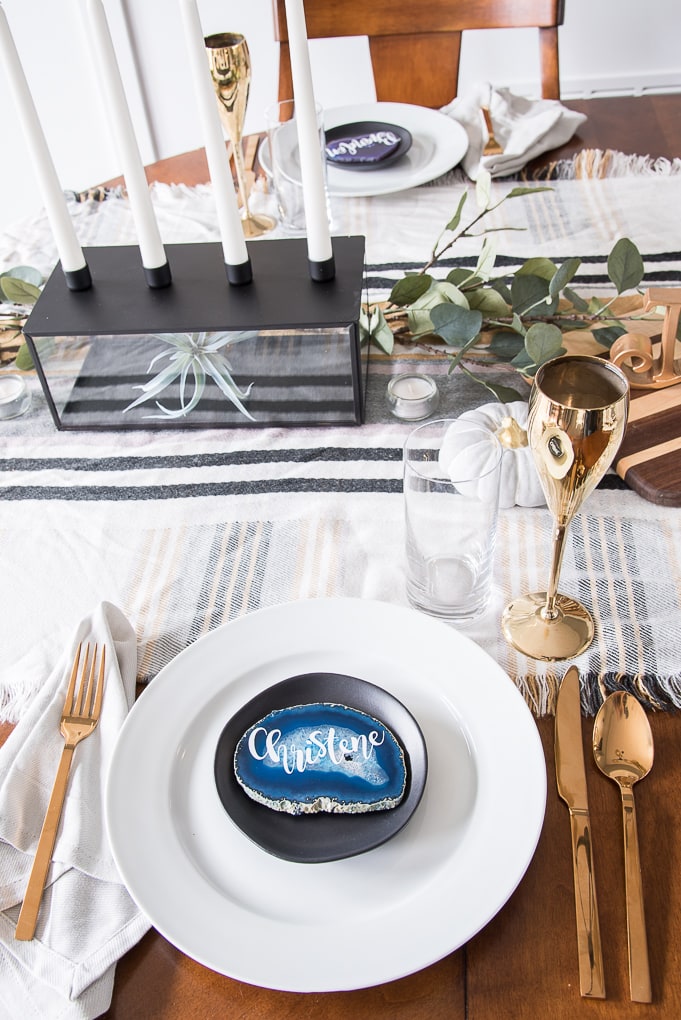
>> Christene
This is so great, I love it! You’ve got to love this room 🙂 If you don’t already, please join us at the The Creative Circle link party. We go live at 7am MST on Thursdays. Hope to see you this Thursday!
Hey Jen! I do LOVE this room. It makes me smile whenever I am in the kitchen 🙂
Thanks for the invite to the link party! I will definitely be linking up!
>> Christene
Board and batten is so pretty! I love how it dressed up this space. I
ve been thinking about possibly tackling board and batten for my nursery. It would be so cute in there!
Hi Jenna! I love board and batten in a nursery! It works with every color scheme and really adds and extra something to the space. Our friends actually just did this in their baby’s nursery for the wall that the crib is on and it turned out great! I say go for it!
>> Christene
I absolutely love board and batten, I actually put it up my stairwell! Love how yours turned out, thanks for sharing at Merry Monday!
Thanks Megan! I love board and batten in a stairwell I think it looks awesome!
>> Christene
The board and batten completely makes this space! You did an amazing job – so gorgeous! Thanks for linking up to our Pretty Project Party 🙂
Thank you so much Sarah!
Hope you have a great week 🙂
>> Christene
This looks amazing! I’m dying to know what color of gray you used for this room?
Hi Jennifer! Thanks so much. The paint color is Hazy Stratus by Valspar.
>> Christene
Where did you get your dining room table/chairs?
Hi! So that set we actually bought from a neighbor who was moving when we lived in an apartment. I think it was originally from Levin Furniture.
Our current table and chairs (seen in the home tour here: https://www.keystoinspiration.com/home-tour-dining-room/) are from Crate and Barrel and Overstock respectively.
>> Christene
Hi, great work. It looks awesome. What did you use on the top?
Thanks! The top is just a 1×2 piece of mdf that we installed perpendicular to the wall to create a ledge detail.
>> Christene
Beautiful, one question my walls are textured so how could I do this?
Hi Tamera! If you have textured walls, you’ll need to take the more traditional approach to board and batten and use actual boards behind the MDF pieces (battens). So instead of attaching the MDF directly to your wall, you’ll want to place something like 4’x8′ board (1/8″ thickness) directly to your wall first to create a flat surface. Use as many as needed to cover the wall and create a smooth surface behind to get that board and batten look. I basically used the shortcut method because we already had smooth walls.
Hope this helps!
>> Christene
What a fantastic idea!
The simplicity of wall moulding to create an accent wall is just brilliant. I love how it transforms a space effortlessly. Can’t wait to try this out and add a touch of elegance to my own home!
This guide on defining a space with board and batten is a game-changer! It offers clear, concise instructions for adding architectural interest and charm to any room. Thanks for sharing these valuable tips and inspiring ideas!